개요

DevOps 방식에서는 정기적으로 여러 배포를 사용하여 '지속적 배포', 'Blue/Green 배포', 'Canary 배포'와 같은 애플리케이션 배포 시나리오를 관리합니다. 이 실습에서는 여러 이기종 배포가 사용되는 일반적인 시나리오를 처리할 수 있도록 컨테이너를 확장 및 관리하는 연습이 제공됩니다.

실습할 내용

  • kubectl 도구 사용 연습
  • 배포 yaml 파일 만들기
  • 배포 시작, 업데이트 및 확장
  • 배포 및 배포 스타일 업데이트 연습

기본 요건

학습을 극대화하려면 이 실습에서 다음을 권장합니다.

  • 다음 Google Cloud Skills Boost 실습을 수강했습니다.

  • Docker 소개

  • Hello Node Kubernetes

  • Linux 시스템 관리 기술이 있습니다.

  • DevOps 이론: 지속적인 배포의 개념을 이해합니다.

배포 소개

이기종 배포에서는 일반적으로 특정한 기술적 요구 또는 운영상의 요구를 충족하기 위해 2개 이상의 상이한 인프라 환경 또는 리전을 연결합니다. 이기종 배포는 배포 특성에 따라 '하이브리드', '다중 클라우드' 또는 '공용/사설'이라고 부릅니다.

이 실습에서 이기종 배포에는 단일 클라우드 환경이나 다중 공용 클라우드 환경(다중 클라우드), 또는 온프레미스와 공용 클라우드가 조합된 환경(하이브리드 또는 공용/사설)에서 진행하는 다수의 리전에 걸친 배포가 포함됩니다.

단일 환경 또는 리전에 한정된 배포에서는 다양한 비즈니스 및 기술적 난점이 발생할 수 있습니다.

  • 여유 리소스 부족: 단일 환경, 특히 온프레미스 환경에서는 프로덕션 요구를 충족시킬 수 있는 컴퓨팅, 네트워킹, 저장소 리소스가 모자랄 수 있습니다.
  • 제한된 지리적 범위: 단일 환경에서의 배포를 위해서는 지리적으로 서로 멀리 떨어진 사용자들이 하나의 배포에 액세스해야 합니다. 이러한 사용자의 트래픽은 특정 위치까지 전 세계를 돌아서 이동합니다.
  • 제한된 가용성: 웹 규모의 트래픽 패턴에서는 애플리케이션의 내결함성 및 탄력성이 상당히 요구됩니다.
  • 공급업체 고착화: 공급업체 수준의 플랫폼 및 인프라 추상화로 인해 애플리케이션 이식이 어려울 수 있습니다.
  • 유연하지 않은 리소스: 특정 컴퓨팅, 저장소 또는 네트워킹 오퍼링 집합으로 리소스가 제한될 수 있습니다.

이기종 배포는 이러한 문제를 해결하는 데 도움이 될 수 있지만, 프로그래매틱하며 결정론적인 프로세스와 절차를 사용해서 아키텍처를 구성해야 합니다. 일회성 또는 임시 배포 절차는 배포 또는 프로세스의 취약성을 높이고 내결함성을 저하시킬 수 있습니다. 임시 프로세스는 데이터 손실 또는 트래픽 누락을 일으킬 수 있습니다. 올바른 배포 프로세스는 반복 가능해야 하며, 입증된 프로비저닝, 구성, 유지 관리 방식을 사용해야 합니다.

이기종 배포를 위한 일반적인 시나리오는 다중 클라우드 배포, 온프레미스 데이터 프론팅, CI/CD(지속적 통합/지속적 배포) 프로세스입니다.

다음 실습에서는 Kubernetes 및 다른 인프라 리소스를 사용한 잘 구성된 접근 방법과 함께 이기종 배포를 위한 몇 가지 일반적인 사용 사례를 연습합니다

영역 설정

  • 다음 명령어를 실행하여 GCP 영역을 설정하고, 로컬 영역을 로 대체합니다.
    $ gcloud config set compute/zone us-east4-a
  1. 샘플코드 가져오기
    $ gsutil -m cp -r gs://spls/gsp053/orchestrate-with-kubernetes .
    $ cd orchestrate-with-kubernetes/kubernetes
  2. 노드 3개로 클러스터를 만듭니다. 이 작업은 완료하는 데 몇 분 정도 걸릴 수 있습니다.
    $ gcloud container clusters create bootcamp \
    --machine-type e2-small \
    --num-nodes 3 \
    --scopes "https://www.googleapis.com/auth/projecthosting,storage-rw"

작업 1. 배포 객체에 관해 알아보기

배포를 시작해 보겠습니다. 먼저 배포 객체를 살펴보겠습니다.

  1. kubectlexplain 명령어를 통해 배포 객체에 관해 알 수 있습니다.
    $ kubectl explain deployment
    

KIND: Deployment
VERSION: apps/v1

DESCRIPTION:
Deployment enables declarative updates for Pods and ReplicaSets.

FIELDS:
apiVersion
APIVersion defines the versioned schema of this representation of an
object. Servers should convert recognized schemas to the latest internal
value, and may reject unrecognized values. More info:
https://git.k8s.io/community/contributors/devel/sig-architecture/api-conventions.md#resources

kind
Kind is a string value representing the REST resource this object
represents. Servers may infer this from the endpoint the client submits
requests to. Cannot be updated. In CamelCase. More info:
https://git.k8s.io/community/contributors/devel/sig-architecture/api-conventions.md#types-kinds

metadata
Standard object's metadata. More info:
https://git.k8s.io/community/contributors/devel/sig-architecture/api-conventions.md#metadata

spec
Specification of the desired behavior of the Deployment.

status
Most recently observed status of the Deployment.

2.  `--recursive` 옵션을 사용하여 모든 필드를 볼 수도 있습니다.
```bash
$ kubectl explain deployment --recursive
  1. 실습을 진행하는 과정에서 explain 명령어를 사용하면 배포 객체의 구조를 이해하고 개별 필드의 기능을 이해하는 데 도움이 됩니다.
    $ kubectl explain deployment.metadata.name
    

KIND: Deployment
VERSION: apps/v1

FIELD: name

DESCRIPTION:
Name must be unique within a namespace. Is required when creating
resources, although some resources may allow a client to request the
generation of an appropriate name automatically. Name is primarily intended
for creation idempotence and configuration definition. Cannot be updated.
More info: http://kubernetes.io/docs/user-guide/identifiers#names


## 작업 2. 배포 만들기

1.  `deployments/auth.yaml` 구성 파일을 업데이트합니다.
```bash
vi deployments/auth.yaml
  1. 배포의 containers 섹션에 있는 image를 다음과 같이 변경합니다.
    ```vim
    ...
    containers:
  • name: auth
    image: kelseyhightower/auth:1.0.0
    ...
  1. 이제 간단한 배포를 만들겠습니다. 배포 구성 파일을 검사합니다.
    $ cat deployments/auth.yaml
    

apiVersion: apps/v1
kind: Deployment
metadata:
name: auth
spec:
replicas: 1
selector:
matchLabels:
app: auth
template:
metadata:
labels:
app: auth
track: stable
spec:
containers:
- name: auth
image: "kelseyhightower/auth:1.0.0"
ports:
- name: http
containerPort: 80
- name: health
containerPort: 81
...


배포를 통해 어떻게 하나의 복제본이 생성되고 버전 1.0.0의 인증 컨테이너를 사용하는지 확인하세요.

`kubectl create` 명령어를 실행하여 인증 배포를 만들면 배포 매니페스트의 데이터에 따라 하나의 포드가 생성됩니다. 즉, `replicas` 필드에 지정된 숫자를 변경하여 포드의 수를 조정할 수 있습니다.

6.  `kubectl create`를 사용하여 배포 객체를 만듭니다.
```bash
$ kubectl create -f deployments/auth.yaml
deployment.apps/auth created
  1. 배포를 만들면 생성 여부를 확인할 수 있습니다.
    $ kubectl get deployments
    NAME   READY   UP-TO-DATE   AVAILABLE   AGE
    auth   1/1     1            1           23s
    

$ kubectl get deployments -o wide
NAME READY UP-TO-DATE AVAILABLE AGE CONTAINERS IMAGES SELECTOR
auth 1/1 1 1 33s auth kelseyhightower/auth:1.0.0 app=auth

8.  배포가 생성되면, Kubernetes에서는 배포에 관한 ReplicaSet를 만듭니다. 배포에 관한 ReplicaSet가 생성되었는지 확인할 수 있습니다.
```bash
$ kubectl get replicasets
NAME             DESIRED   CURRENT   READY   AGE
auth-5c65b6d58   1         1         1       103s

이름이 auth-xxxxxxx인 ReplicaSet가 표시되어야 합니다.

  1. 마지막으로, 배포의 일부로 생성된 포드를 볼 수 있습니다. ReplicaSet가 생성될 때 Kubernetes에서 단일 포드를 생성합니다.
    $ kubectl get pods
    NAME                   READY   STATUS    RESTARTS   AGE
    auth-5c65b6d58-tqwbn   1/1     Running   0          2m3s
  2. 이제 인증을 배포하기 위한 서비스를 만들 차례입니다. 서비스 매니페스트 파일은 이미 살펴보았으므로 여기서는 자세히 설명하지 않겠습니다. kubectl create 명령어를 사용하여 인증 서비스를 만듭니다.
    $ kubectl create -f services/auth.yaml
    service/auth created
  3. 이제 같은 방법으로 hello 배포를 만들고 노출합니다.
    $ kubectl create -f deployments/hello.yaml
    deployment.apps/hello created
    $ kubectl create -f services/hello.yaml
    service/hello created
  4. 한번 더 frontend 배포를 만들고 노출합니다.
    $ kubectl create secret generic tls-certs --from-file tls/
    $ kubectl create configmap nginx-frontend-conf --from-file=nginx/frontend.conf
    $ kubectl create -f deployments/frontend.yaml
    $ kubectl create -f services/frontend.yaml
    

configmap/nginx-frontend-conf created
deployment.apps/frontend created
service/frontend created

> **참고:** 프런트엔드용 ConfigMap을 만들었습니다.

13.  외부 IP를 가져와서 프런트엔드와 연결함으로써 프런트엔드와 상호작용합니다.
```bash
$ kubectl get services frontend
NAME       TYPE           CLUSTER-IP    EXTERNAL-IP     PORT(S)         AGE
frontend   LoadBalancer   10.88.6.204   35.199.58.119   443:30354/TCP   38s

참고: 서비스에 대해 ExternalIP 필드가 채워지는 데 몇 초 정도 걸릴 수 있습니다. 이것은 정상입니다. 필드가 채워질 때까지 몇 초마다 위의 명령을 다시 실행하십시오.

$ curl -ks https://<EXTERNAL-IP>
{"message":"Hello"}
  1. kubectl의 출력 템플릿 기능을 사용하여 curl을 한 줄 명령어로 사용할 수도 있습니다.
    $ curl -ks https://`kubectl get svc frontend -o=jsonpath="{.status.loadBalancer.ingress[0].ip}"`

배포 확장

이제 배포가 생성되었으므로 확장할 수 있습니다. spec.replicas 필드를 업데이트하면 됩니다.

  1. kubectl explain 명령어를 다시 사용하여 이 필드에 관한 설명을 볼 수 있습니다.
    $ kubectl explain deployment.spec.replicas
    KIND:     Deployment
    VERSION:  apps/v1
    

FIELD: replicas

DESCRIPTION:
Number of desired pods. This is a pointer to distinguish between explicit
zero and not specified. Defaults to 1.

2.  replicas 필드를 가장 쉽게 업데이트하는 방법은 `kubectl scale` 명령어를 사용하는 것입니다.
```bash
$ kubectl scale deployment hello --replicas=5
deployment.apps/hello scaled

참고: 새 pod가 모두 시작되는 데는 1~2분 정도 걸릴 수 있습니다.

배포가 업데이트된 후, Kubernetes는 연결된 ReplicaSet를 자동으로 업데이트하고 새로운 pod를 시작하여 pod의 총 개수를 5로 만듭니다.

  1. 현재 hello 포드가 5개 실행되고 있는지 확인합니다.
    $ kubectl get pods | grep hello- | wc -l
    5
  2. 이제 애플리케이션을 다시 축소합니다.
    $ kubectl scale deployment hello --replicas=3
  3. 포드 개수가 맞는지 다시 확인합니다.
    $ kubectl get pods | grep hello- | wc -l
    3
    지금까지 Kubernetes 배포와 포드 그룹을 관리하고 확장하는 방법을 알아보았습니다.

작업 3. 순차적 업데이트

배포는 순차적 업데이트 메커니즘을 통해 이미지를 새 버전으로 업데이트하도록 지원합니다. 배포가 새 버전으로 업데이트되면 새 ReplicaSet가 만들어지고, 이전 ReplicaSet의 복제본이 감소하면서 새 ReplicaSet의 복제본 수가 천천히 증가합니다.

8d107e36763fd5c1.png

순차적 업데이트 트리거하기

  1. 배포를 업데이트하려면 다음 명령어를 실행합니다.
    $ kubectl edit deployment hello
  2. 배포의 containers 섹션에 있는 image를 다음과 같이 변경합니다.
    ...
    containers:
    image: kelseyhightower/hello:2.0.0
    ...
    편집기에서 저장하면, 업데이트된 배포가 클러스터에 저장되고 Kubernetes에서 순차적 업데이트가 시작됩니다.
  3. Kubernetes에서 생성한 새로운 ReplicaSet를 확인합니다.
    $ kubectl get replicaset
    NAME                 DESIRED   CURRENT   READY   AGE
    auth-5c65b6d58       1         1         1       30m
    frontend-886c96b4d   1         1         1       9m55s
    hello-7c575694fc     1         1         1       10m
    hello-8654fb85d      3         3         2       33s
  4. 출시 기록에 새로운 항목이 표시될 수도 있습니다.
    $ kubectl rollout history deployment/hello
    eployment.apps/hello
    REVISION  CHANGE-CAUSE
    1         <none>
    2         <none>

    순차적 업데이트 일시중지하기

실행 중인 출시에 문제가 발생하면 일시중지하여 업데이트를 중지합니다.

  1. 지금 중지해보세요.
    $ kubectl rollout pause deployment/hello
    deployment.apps/hello paused
  2. 현재 출시 상태를 확인합니다.
    $ kubectl rollout status deployment/hello
    deployment "hello" successfully rolled out
  3. 포드에서 직접 확인할 수도 있습니다.
    $ kubectl get pods -o jsonpath --template='{range .items[*]}{.metadata.name}{"\t"}{"\t"}{.spec.containers[0].image}{"\n"}{end}'
    auth-5c65b6d58-tqwbn            kelseyhightower/auth:1.0.0
    frontend-886c96b4d-72rxf                nginx:1.9.14
    hello-8654fb85d-jmh7p           kelseyhightower/hello:2.0.0
    hello-8654fb85d-njgcb           kelseyhightower/hello:2.0.0
    hello-8654fb85d-rqfht           kelseyhightower/hello:2.0.0

    순차적 업데이트 재개하기

출시가 일시중지되었으므로 일부 포드는 새 버전이고 일부 포드는 이전 버전입니다.

  1. resume 명령어를 사용하여 출시를 계속 진행할 수 있습니다.
    $ kubectl rollout resume deployment/hello
    deployment.apps/hello resumed
  2. 출시가 완료되면 status 명령어를 실행할 때 다음이 표시됩니다.
    $ kubectl rollout status deployment/hello
    deployment "hello" successfully rolled out

    업데이트 롤백하기

새 버전에서 버그가 발견되었다고 가정해 보겠습니다. 새 버전에 문제가 있는 것으로 간주되므로 새 포드에 연결된 모든 사용자가 문제를 경험하게 됩니다.

이전 버전으로 롤백하여 문제를 조사한 다음 제대로 수정된 버전을 출시할 수 있습니다.

  1. rollout 명령어를 사용하여 이전 버전으로 롤백합니다.
    $ kubectl rollout undo deployment/hello
    deployment.apps/hello rolled back
  2. 기록에서 롤백을 확인합니다.
    $ kubectl rollout history deployment/hello
    deployment.apps/hello
    REVISION  CHANGE-CAUSE
    2         <none>
    3         <none>
  3. 마지막으로, 모든 포드가 이전 버전으로 롤백되었는지 확인합니다.
    $ kubectl get pods -o jsonpath --template='{range .items[*]}{.metadata.name}{"\t"}{"\t"}{.spec.containers[0].image}{"\n"}{end}'
    auth-5c65b6d58-tqwbn            kelseyhightower/auth:1.0.0
    frontend-886c96b4d-72rxf                nginx:1.9.14
    hello-7c575694fc-2lmt5          kelseyhightower/hello:1.0.0
    hello-7c575694fc-6sxmd          kelseyhightower/hello:1.0.0
    hello-7c575694fc-rjs57          kelseyhightower/hello:1.0.0

    작업 4. Canary 배포

프로덕션 환경에서 일부 사용자를 대상으로 새 배포를 테스트하려면 Canary 배포를 사용하세요. Canary 배포를 사용하면 작은 규모의 일부 사용자에게만 변경 사항을 릴리스하여 새로운 릴리스와 관련된 위험을 완화할 수 있습니다.

Canary 배포 만들기

Canary 배포는 새 버전의 별도 배포와 함께 기존 안정화 배포 및 Canary 배포를 동시에 대상으로 삼는 서비스로 구성됩니다.

48190cf58fdf2eeb.png

  1. 먼저 새 버전의 새로운 Canary 배포를 만듭니다.
    $ cat deployments/hello-canary.yaml
  2. 이제 Canary 배포를 만듭니다.
    $ kubectl create -f deployments/hello-canary.yaml
    deployment.apps/hello-canary created
  3. Canary 배포를 만들면 hellohello-canary의 두 가지 배포가 생깁니다. 다음 kubectl 명령어로 확인하세요.
    $ kubectl get deployments
    NAME           READY   UP-TO-DATE   AVAILABLE   AGE
    auth           1/1     1            1           38m
    frontend       1/1     1            1           18m
    hello          3/3     3            3           19m
    hello-canary   1/1     1            1           32s
    hello 서비스에서 선택기는 프로덕션 배포 및 Canary 배포의 pod에 모두 맞는 app:hello 선택기를 사용합니다. 그러나 Canary 배포가 포드 수가 더 적기 때문에 더 적은 수의 사용자에게 표시됩니다.

Canary 배포 확인하기

  1. 요청에서 제공되는 hello 버전을 확인할 수 있습니다.
    curl -ks https://`kubectl get svc frontend -o=jsonpath="{.status.loadBalancer.ingress[0].ip}"`/version
    {"version":"1.0.0"}

    프로덕션 환경의 Canary 배포 - 세션 어피니티

이 실습의 사례에서는 Nginx 서비스로 전송된 모든 요청이 Canary 배포에서 처리될 가능성이 있었습니다. 어떤 사용자가 Canary 배포를 통해 서비스를 받지 못하도록 하려면 다른 접근 방식이 필요합니다. 예를 들어, 애플리케이션의 UI가 변경되어 특정 사용자에게 혼동을 주지 않으려는 경우가 있을 수 있습니다. 이와 같은 경우에는 해당 사용자를 한 배포 또는 다른 배포에 '고정'해야 합니다.

서비스와 함께 세션 어피티니를 만들면 동일한 사용자에게 항상 동일한 버전을 제공할 수 있습니다. 아래 예제에서 서비스는 이전과 동일하지만 새로운 sessionAffinity 필드가 추가되어 ClientIP로 설정됩니다. IP 주소가 동일한 모든 클라이언트는 동일한 버전의 hello 애플리케이션으로 요청을 보냅니다.

kind: Service
apiVersion: v1
metadata:
  name: "hello"
spec:
  sessionAffinity: ClientIP
  selector:
    app: "hello"
  ports:
    - protocol: "TCP"
      port: 80
      targetPort: 80

이를 테스트하기 위한 환경을 설정하기가 어렵기 때문에 여기에서는 테스트할 필요가 없지만, 프로덕션 환경의 Canary 배포에는 sessionAffinity를 사용할 수 있습니다.

작업 5. Blue/Green 배포

순차적 업데이트는 최소한의 오버헤드, 최소한의 성능 영향, 최소한의 다운타임으로 애플리케이션을 배포할 수 있기 때문에 가장 좋은 업데이트 방식입니다. 그러나 배포를 모두 완료한 후에 부하 분산기를 수정하여 새 버전을 가리키도록 하는 것이 유리한 경우가 있습니다. 이 경우에는 Blue/Green 배포가 도움이 됩니다.

Kubernetes에서는 이전의 'blue' 버전용 배포와 새로운 'green' 버전용 배포를 만들어 업데이트할 수 있습니다. 'blue' 버전에 기존 hello 배포를 사용하면 라우터 역할을 하는 서비스를 통해 배포에 액세스하게 됩니다. 새 'green' 버전이 가동 및 실행되면 서비스를 업데이트하여 이 버전을 사용하도록 전환하게 됩니다.

9e624196fdaf4534.png

Blue/Green 배포의 주요 단점은 애플리케이션을 호스팅하려면 클러스터에 최소 2배의 리소스가 필요하다는 점입니다. 한 번에 두 버전의 애플리케이션을 배포하려면 먼저 클러스터에 충분한 리소스가 있는지 확인하세요.

서비스

기존의 hello 서비스를 사용하되 app:hello, version: 1.0.0으로 선택기를 업데이트하세요. 선택기는 기존의 'blue' 배포를 선택하지만 그러나 다른 버전을 사용할 것이기 때문에 'green' 배포는 선택하지 않습니다.

먼저 서비스를 업데이트합니다.

$ kubectl apply -f services/hello-blue.yaml
Warning: resource services/hello is missing the kubectl.kubernetes.io/last-applied-configuration annotation which is required by kubectl apply. kubectl apply should only be used on resources created declaratively by either kubectl create --save-config or kubectl apply. The missing annotation will be patched automatically.
service/hello configured

참고: resource service/hello is missing이라는 경고는 자동으로 패치되므로 무시하십시오.

Blue/Green 배포를 사용하여 업데이트하기

Blue/Green 배포 스타일을 지원하기 위해 새 버전용으로 새로운 'green' 배포를 만들 것입니다. Green 배포에서 버전 라벨과 이미지 경로를 업데이트합니다.

  1. Green 배포를 만듭니다.
    $ kubectl create -f deployments/hello-green.yaml
    deployment.apps/hello-green created
  2. Green 배포가 있고 제대로 시작된 경우 현재 1.0.0 버전이 아직 사용되고 있는지 확인합니다.
    $ curl -ks https://`kubectl get svc frontend -o=jsonpath="{.status.loadBalancer.ingress[0].ip}"`/version
    {"version":"1.0.0"}
  3. 이제 서비스가 새 버전을 가리키도록 업데이트합니다.
    $ kubectl apply -f services/hello-green.yaml
    service/hello configured
  4. 서비스가 업데이트되면 'green' 배포가 즉시 사용됩니다. 이제 항상 새 버전이 사용되고 있는지 확인할 수 있습니다.
    $ curl -ks https://`kubectl get svc frontend -o=jsonpath="{.status.loadBalancer.ingress[0].ip}"`/version
    {"version":"2.0.0"}

    Blue/Green 롤백

필요한 경우 같은 방법으로 이전 버전으로 롤백할 수 있습니다.

  1. 'blue' 배포가 아직 실행 중일 때 서비스를 이전 버전으로 다시 업데이트하면 됩니다.
    $ kubectl apply -f services/hello-blue.yaml
  2. 서비스를 업데이트하면 롤백이 성공적으로 완료됩니다. 사용 중인 버전이 정확한지 다시 확인합니다.
    $ curl -ks https://`kubectl get svc frontend -o=jsonpath="{.status.loadBalancer.ingress[0].ip}"`/version
    {"version":"1.0.0"}
반응형

개요

이 실습에서는 다음 작업을 실행하는 방법을 학습합니다.

  • Kubernetes Engine을 사용하여 완전한 Kubernetes 클러스터를 프로비저닝합니다.
  • kubectl을 사용하여 Docker 컨테이너를 배포하고 관리합니다.
  • Kubernetes의 디플로이먼트 및 서비스를 사용하여 애플리케이션을 마이크로서비스로 분할합니다.

Kubernetes는 애플리케이션에 중점을 둡니다. 이 실습 부분에서는 'app'이라는 예제 애플리케이션을 사용하여 실습을 완료합니다.

App은 Github에서 호스팅되며 12요소 예시 애플리케이션을 제공합니다. 이 실습에서는 다음 Docker 이미지를 다룹니다.

Kubernetes는 kubernetes.io에서 사용할 수 있는 오픈소스 프로젝트이며 노트북에서 고가용성 다중 노드 클러스터, 공용 클라우드에서 온프레미스 배포, 가상 머신에서 베어 메탈까지 다양한 환경에서 실행 가능합니다.

이 실습에서는 Kubernetes Engine과 같은 관리 환경을 사용하여 기본 인프라를 설정하기보다는 Kubernetes를 경험하는 데 집중합니다.

Google Kubernetes Engine

Cloud Shell 환경에서 다음 명령어를 입력하여 영역을 설정합니다. (5분 이상 소요)

$ gcloud config set compute/zone us-central1-b

Updated property [compute/zone].

$ gcloud container clusters create io

Default change: VPC-native is the default mode during cluster creation for versions greater than 1.21.0-gke.1500. To create advanced routes based clusters, please pass the `--no-enable-ip-alias` flag
Default change: During creation of nodepools or autoscaling configuration changes for cluster versions greater than 1.24.1-gke.800 a default location policy is applied. For Spot and PVM it defaults to ANY, and for all other VM kinds a BALANCED policy is used. To change the default values use the `--location-policy` flag.
Note: Your Pod address range (`--cluster-ipv4-cidr`) can accommodate at most 1008 node(s).
Creating cluster io in us-central1-b... Cluster is being deployed...working..   

참고: Kubernetes Engine이 백그라운드에서 몇몇 가상 머신을 프로비저닝하고 있으므로 클러스터를 만드는 데 다소 시간이 걸립니다.

샘플 코드 가져오기

Cloud Shell 명령줄에서 GitHub 저장소를 클론합니다.

$ gsutil cp -r gs://spls/gsp021/* .
$ cd orchestrate-with-kubernetes/kubernetes
$ ls

deployments/  /* 디플로이먼트 매니페스트  */
  ...
nginx/        /* nginx 구성 파일 */
  ...
pods/         /* 포드 매니페스트 */
  ...
services/     /* 서비스 매니페스트 */
  ...
tls/          /* TLS 인증서 */
  ...
cleanup.sh    /* 정리 스크립트 */

코드를 가져왔으므로 이제 Kubernetes를 사용해 보겠습니다.

간략한 Kubernetes 데모

Kubernetes를 시작하는 가장 쉬운 방법은 kubectl create 명령어를 사용하는 것입니다. 이를 사용하여 nginx 컨테이너의 단일 인스턴스를 실행합니다.

$ kubectl create deployment nginx --image=nginx:1.10.0
deployment.apps/nginx created

Kubernetes가 배포를 생성했습니다. 배포에 관해서는 나중에 다시 설명드리겠습니다. 지금 알아야 하는 점은 배포 덕분에 pod가 작동하고 있으며, pod가 실행하는 노드에 오류가 발생해도 계속해서 작동한다는 점입니다.

Kubernetes에서 모든 컨테이너는 포드에서 실행됩니다. kubectl get pods 명령어를 사용하여 실행 중인 nginx 컨테이너를 확인합니다.

$ kubectl get pods

NAME                     READY   STATUS    RESTARTS   AGE
nginx-68899cc8d6-mbxms   1/1     Running   0          30s

nginx 컨테이너가 실행되면 kubectl expose 명령어를 사용하여 Kubernetes 외부로 노출시킬 수 있습니다.

$ kubectl expose deployment nginx --port 80 --type LoadBalancer
service/nginx exposed

방금 무슨 일이 일어났을까요? Kubernetes가 백그라운드에서 공개 IP 주소가 첨부된 외부 부하 분산기를 만들었습니다. 이 공개 IP 주소를 조회하는 모든 클라이언트는 서비스 백그라운드에 있는 포드로 라우팅됩니다. 이 경우에는 nginx 포드로 라우팅됩니다.

이제 kubectl get services 명령어를 사용하여 서비스를 나열합니다.

$ kubectl get services

NAME         TYPE           CLUSTER-IP    EXTERNAL-IP   PORT(S)        AGE
kubernetes   ClusterIP      10.72.0.1     <none>        443/TCP        3m29s
nginx        LoadBalancer   10.72.13.84   <pending>     80:31884/TCP   3s

참고: 서비스를 위해 ExternalIP 필드가 채워지는 데는 몇 초 정도 소요될 수 있습니다. 이는 정상적인 현상입니다. 필드가 채워질 때까지 몇 초마다 kubectl get services 명령어를 다시 실행합니다.

원격으로 Nginx 컨테이너를 조회하려면 이 명령어에 외부 IP를 추가합니다.

curl http://<External IP>:80

이제 됐습니다. Kubernetes는 kubectl 실행 및 노출 명령어로 바로 사용할 수 있는 간편한 워크플로를 지원합니다.

포드

Kubernetes의 핵심에는 포드가 있습니다.

포드는 1개 이상의 컨테이너가 포함된 모음을 나타냅니다. 일반적으로 상호 의존성이 높은 컨테이너가 여러 개 있으면 이를 하나의 포드에 패키징합니다.
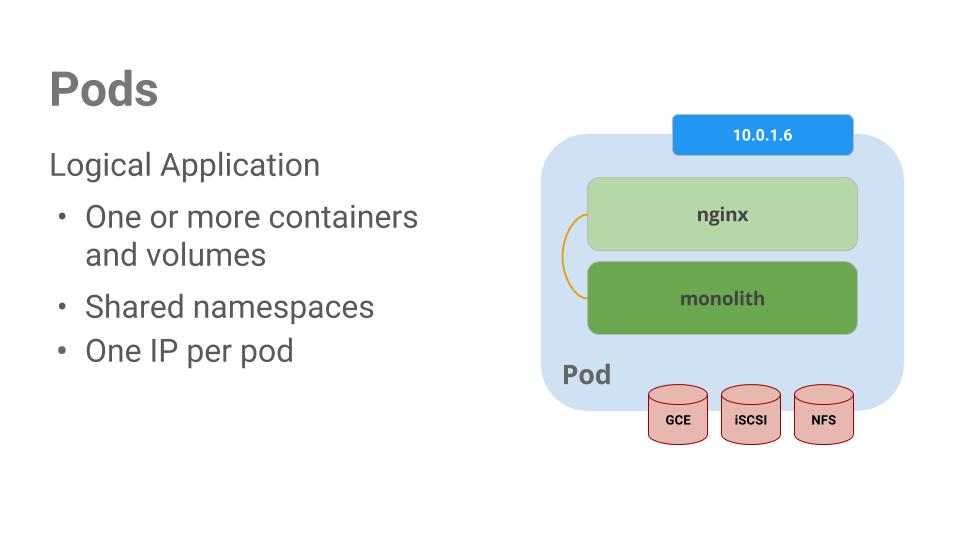
fb02d86798243fcb.png

이 예시에는 모놀리식 및 nginx 컨테이너가 포함된 포드가 있습니다.

포드에는 볼륨 또한 포함되어 있습니다. 볼륨은 포드가 존재하는 한 계속해서 존재하는 데이터 디스크이며 포드에 포함된 컨테이너에 의해 사용될 수 있습니다. 포드는 콘텐츠에 공유된 네임스페이스를 제공합니다. 즉, 이 예시의 포드 안에 있는 2개의 컨테이너는 서로 통신할 수 있으며 첨부된 볼륨도 공유합니다.

또한 포드는 네트워크 네임스페이스도 공유합니다. 즉, 포드는 IP 주소를 1개씩 갖고 있습니다.

이제 포드에 관해 더 자세히 살펴보겠습니다.

포드 만들기

포드는 포드 구성 파일을 사용하여 만들 수 있습니다. 모놀리식 포드 구성 파일을 살펴보겠습니다. 다음을 실행해 보세요.

cat pods/monolith.yaml

열린 구성 파일이 출력됩니다.

apiVersion: v1
kind: Pod
metadata:
  name: monolith
  labels:
    app: monolith
spec:
  containers:
    - name: monolith
      image: kelseyhightower/monolith:1.0.0
      args:
        - "-http=0.0.0.0:80"
        - "-health=0.0.0.0:81"
        - "-secret=secret"
      ports:
        - name: http
          containerPort: 80
        - name: health
          containerPort: 81
      resources:
        limits:
          cpu: 0.2
          memory: "10Mi"

여기서 주목해야 할 부분이 몇 군데 있습니다. 다음과 같은 부분을 확인합니다.

  • 포드가 1개의 컨테이너(모놀리식)로 구성되어 있습니다.
  • 시작할 때 컨테이너로 몇 가지 인수가 전달됩니다.
  • HTTP 트래픽용 포드 80이 개방됩니다.

kubectl을 사용하여 모놀리식 포드를 만듭니다.

$ kubectl create -f pods/monolith.yaml
pod/monolith created

포드를 살펴보세요. kubectl get pods 명령어를 사용하여 기본 네임스페이스에서 실행 중인 모든 포드를 나열합니다.

$ kubectl get pods
NAME                     READY   STATUS    RESTARTS   AGE
monolith                 1/1     Running   0          5s
nginx-68899cc8d6-mbxms   1/1     Running   0          6m31s

참고: 모놀리식 pod가 작동하는 데는 몇 초 정도 걸릴 수 있습니다. 이를 실행하기 위해 Docker Hub에서 모놀리식 컨테이너 이미지를 가져와야 합니다.

포드가 실행되면 kubectl describe 명령어를 사용하여 모놀리식 포드에 관해 자세히 알아봅니다.

$ kubectl describe pods monolith

Name:             monolith
Namespace:        default
Priority:         0
Service Account:  default
Node:             gke-io-default-pool-0935d588-wsgq/10.128.0.5
Start Time:       Mon, 17 Apr 2023 14:31:07 +0000
Labels:           app=monolith
Annotations:      <none>
Status:           Running
IP:               10.68.2.6
IPs:
  IP:  10.68.2.6
Containers:
  monolith:
    Container ID:  containerd://0e1480aa970c23e1a20a2a27ae023c38fc89aac8999863eeebd2d8689efcbc13
student_01_1d660bd4cf04@cloudshell:~ (qwiklabs-gcp-04-750f8d78df82)$ kubectl describe pods monolith
Name:             monolith
Namespace:        default
Priority:         0
Service Account:  default
Node:             gke-io-default-pool-0935d588-wsgq/10.128.0.5
Start Time:       Mon, 17 Apr 2023 14:31:07 +0000
Labels:           app=monolith
Annotations:      <none>
Status:           Running
IP:               10.68.2.6
IPs:
  IP:  10.68.2.6
Containers:
  monolith:
    Container ID:  containerd://0e1480aa970c23e1a20a2a27ae023c38fc89aac8999863eeebd2d8689efcbc13
    Image:         kelseyhightower/monolith:1.0.0
    Image ID:      sha256:980e09dd5c76f726e7369ac2c3aa9528fe3a8c92382b78e97aa54a4a32d3b187
    Ports:         80/TCP, 81/TCP
    Host Ports:    0/TCP, 0/TCP
    Args:
      -http=0.0.0.0:80
      -health=0.0.0.0:81
      -secret=secret
    State:          Running
      Started:      Mon, 17 Apr 2023 14:31:11 +0000
    Ready:          True
    Restart Count:  0
    Limits:
      cpu:     200m
      memory:  10Mi
    Requests:
      cpu:        200m
      memory:     10Mi
    Environment:  <none>
    Mounts:
      /var/run/secrets/kubernetes.io/serviceaccount from kube-api-access-z5vc8 (ro)
Conditions:
  Type              Status
  Initialized       True
  Ready             True
  ContainersReady   True
  PodScheduled      True
Volumes:
  kube-api-access-z5vc8:
    Type:                    Projected (a volume that contains injected data from multiple sources)
    TokenExpirationSeconds:  3607
    ConfigMapName:           kube-root-ca.crt
    ConfigMapOptional:       <nil>
    DownwardAPI:             true
QoS Class:                   Guaranteed
Node-Selectors:              <none>
Tolerations:                 node.kubernetes.io/not-ready:NoExecute op=Exists for 300s
                             node.kubernetes.io/unreachable:NoExecute op=Exists for 300s
Events:
  Type    Reason     Age   From               Message
  ----    ------     ----  ----               -------
  Normal  Scheduled  85s   default-scheduler  Successfully assigned default/monolith to gke-io-default-pool-0935d588-wsgq
  Normal  Pulling    83s   kubelet            Pulling image "kelseyhightower/monolith:1.0.0"
  Normal  Pulled     81s   kubelet            Successfully pulled image "kelseyhightower/monolith:1.0.0" in 1.623212676s
  Normal  Created    81s   kubelet            Created container monolith
  Normal  Started    81s   kubelet            Started container monolith

포드 IP 주소 및 이벤트 로그를 포함한 모놀리식 포드에 관한 여러 정보가 표시됩니다. 이 정보는 문제해결 시 유용하게 사용됩니다.

Kubernetes를 사용하면 구성 파일에 포드에 관해 설명하여 간편하게 포드를 만들 수 있으며, 포드가 실행 중일 때 정보를 쉽게 확인할 수 있습니다. 이제 디플로이먼트에 필요한 모든 포드를 만들 수 있습니다.

포드와 상호작용하기

포드에는 기본적으로 비공개 IP 주소가 부여되며 클러스터 밖에서는 접근할 수 없습니다. kubectl port-forward 명령어를 사용하여 로컬 포트를 모놀리식 포드 안의 포트로 매핑합니다.

이 시점부터 포드 간 통신을 설정하기 위해 실습이 여러 Cloud Shell 탭에서 진행됩니다. 두 번째 또는 세 번째 명령어 셸에서 실행되는 명령어는 명령어 안내에 표시됩니다.

Cloud Shell 터미널 2개를 엽니다. 하나는 kubectl port-forward 명령어를 실행하고 다른 하나는 curl 명령어를 실행하기 위한 것입니다.

두 번째 터미널에서 다음 명령어를 사용하여 포드 전달을 설정합니다.

$ kubectl port-forward monolith 10080:80
Forwarding from 127.0.0.1:10080 -> 80
Handling connection for 10080

첫 번째 터미널에서 curl을 사용하여 pod와 통신을 시작합니다.

$ curl http://127.0.0.1:10080
{"message":"Hello"}

성공입니다. 컨테이너가 친절하게도 'hello'라고 인사를 건넵니다.

이제 curl 명령어를 사용하여 보안이 설정된 엔드포인트를 조회하면 어떻게 되는지 살펴보겠습니다.

$ curl http://127.0.0.1:10080/secure
authorization failed

문제가 발생했습니다.

모놀리식에서 다시 인증 토큰을 얻기 위해 로그인을 시도합니다.

$ curl -u user http://127.0.0.1:10080/login

Enter host password for user 'user':
{"token":"eyJhbGciOiJIUzI1NiIsInR5cCI6IkpXVCJ9.eyJlbWFpbCI6InVzZXJAZXhhbXBsZS5jb20iLCJleHAiOjE2ODIwMDEzMDQsImlhdCI6MTY4MTc0MjEwNCwiaXNzIjoiYXV0aC5zZXJ2aWNlIiwic3ViIjoidXNlciJ9.3dlmkdzGseb2HqgR6IVVrwcTRpmrHLJ5ItgNIi_N7CE"}

로그인 메시지에서 일급 비밀번호인 'password'를 사용하여 로그인합니다.

로그인하여 JWT 토큰이 출력되었습니다. Cloud Shell은 긴 문자열을 제대로 복사하지 못하니 토큰을 위한 환경 변수를 만듭니다.

$ TOKEN=$(curl http://127.0.0.1:10080/login -u user|jq -r '.token')

호스트 비밀번호를 묻는 메시지가 나타나면 일급 비밀번호 'password'를 다시 입력합니다.

다음 명령어를 사용하여 토큰을 복사하고, 이 토큰으로 curl을 사용하여 보안이 설정된 엔드포인트를 조회합니다.

$ curl -H "Authorization: Bearer $TOKEN" http://127.0.0.1:10080/secure
{"message":"Hello"}

이제 애플리케이션으로부터 모두 제대로 작동한다는 응답이 전송될 것입니다.

kubectl logs 명령어를 사용하여 monolith 포드의 로그를 확인합니다.

$ kubectl logs monolith

세 번째 터미널을 열고 -f 플래그를 사용하여 실시간 로그 스트림을 가져옵니다.

$ kubectl logs -f monolith

첫 번째 터미널에서 curl을 사용하여 모놀리식 pod와 상호작용했다면 세 번째 터미널에서 로그가 업데이트되는 것을 확인할 수 있습니다.

# curl http://127.0.0.1:10080

kubectl exec 명령어를 사용하여 모놀리식 포드의 대화형 셸을 실행합니다. 이는 컨테이너 내부에서 문제를 해결할 때 유용합니다.

$ kubectl exec monolith --stdin --tty -c monolith /bin/sh

예를 들어 모놀리식 컨테이너에 셸이 있으면 ping 명령어를 사용하여 외부 연결을 테스트할 수 있습니다.

$ ping -c 3 google.com

대화형 셸 사용을 완료한 후에는 반드시 로그아웃합니다.

$ exit

이와 같이 포드와의 상호작용은 kubectl 명령을 사용하는 것만큼 쉽습니다. 원격으로 컨테이너를 조회하거나 로그인 셸이 필요한 경우 Kubernetes가 작업에 필요한 모든 것을 제공합니다.

서비스

포드는 영구적으로 지속되지 않습니다. 활성 여부 또는 준비 상태 검사 오류와 같은 다양한 이유로 중지되거나 시작될 수 있으며, 이로 인해 문제가 발생합니다.

포드 집합과 통신해야 하는 경우 어떻게 해야 할까요? 포드가 다시 시작되면 IP 주소가 바뀔 수도 있습니다.

이와 같은 상황에서 서비스가 유용합니다. 서비스는 포드를 위해 안정적인 엔드포인트를 제공합니다.
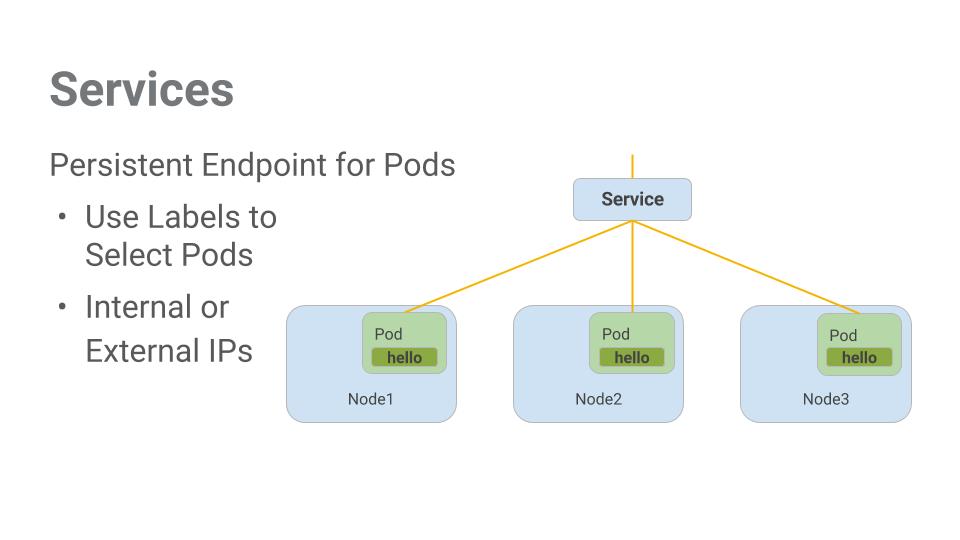
393e02e1d49f3b37.png

서비스는 라벨을 사용하여 어떤 포드에서 작동할지 결정합니다. 포드에 라벨이 정확히 지정되어 있다면 서비스가 이를 자동으로 감지하고 노출시킵니다.

서비스가 제공하는 포드 집합에 대한 액세스 수준은 서비스 유형에 따라 다릅니다. 현재 3가지 유형이 있습니다.

  • ClusterIP(내부) -- 기본 유형이며 이 서비스는 클러스터 안에서만 볼 수 있습니다.
  • NodePort 클러스터의 각 노드에 외부에서 액세스 가능한 IP 주소를 제공합니다.
  • LoadBalancer는 클라우드 제공업체로부터 부하 분산기를 추가하며 서비스에서 유입되는 트래픽을 내부에 있는 노드로 전달합니다.

이제 다음 작업을 실행하는 방법을 학습합니다.

  • 서비스 만들기
  • 라벨 셀랙터를 사용하여 제한된 포드 집합을 외부에 노출하기

서비스 만들기

서비스를 만들기 전에 https 트래픽을 처리할 수 있는 보안이 설정된 포드를 만듭니다.

디렉토리를 수정했을 경우 ~/orchestrate-with-kubernetes/kubernetes 디렉토리로 다시 돌아갑니다.

cd ~/orchestrate-with-kubernetes/kubernetes

모놀리식 서비스 구성 파일을 살펴봅니다.

cat pods/secure-monolith.yaml

보안이 설정된 모놀리식 포드와 구성 데이터를 만듭니다.

$ kubectl create secret generic tls-certs --from-file tls/
secret/tls-certs created
$ kubectl create configmap nginx-proxy-conf --from-file nginx/proxy.conf
configmap/nginx-proxy-conf created
$ kubectl create -f pods/secure-monolith.yaml
pod/secure-monolith created

이제 보안이 설정된 포드가 있으니 이를 외부로 노출시킵니다. 이렇게 하기 위해 Kubernetes 서비스를 만듭니다.

모놀리식 서비스 구성 파일을 살펴봅니다.

cat services/monolith.yaml

(출력):

kind: Service
apiVersion: v1
metadata:
  name: "monolith"
spec:
  selector:
    app: "monolith"
    secure: "enabled"
  ports:
    - protocol: "TCP"
      port: 443
      targetPort: 443
      nodePort: 31000
  type: NodePort

참고

  1. app: monolithsecure: enabled 라벨이 지정된 포드를 자동으로 찾고 노출시키는 선택기가 있습니다.
  2. 외부 트래픽을 포트 31000에서 포트 443의 nginx로 전달하기 위해 NodePort를 노출시켜야 합니다.

kubectl create 명령어를 사용하여 모놀리식 서비스 구성 파일에서 모놀리식 서비스를 만듭니다.

$ kubectl create -f services/monolith.yaml
service/monolith created

서비스 노출 시에는 pod가 사용됩니다. 즉, 다른 앱이 서버 중 하나의 포트 31000과 연결을 시도하면 포트 충돌이 발생할 수 있습니다.

일반적으로 포트 할당은 Kubernetes가 처리합니다. 이 실습에서는 포트를 선택했기 때문에 추후 더 쉽게 상태 확인을 설정할 수 있습니다.

gcloud compute firewall-rules 명령어를 사용하여 트래픽을 노출된 NodePort의 모놀리식 서비스로 보냅니다.

$ gcloud compute firewall-rules create allow-monolith-nodeport --allow=tcp:31000
Creating firewall...working..Created [https://www.googleapis.com/compute/v1/projects/qwiklabs-gcp-04-750f8d78df82/global/firewalls/allow-monolith-nodeport].
Creating firewall...done.
NAME: allow-monolith-nodeport
NETWORK: default
DIRECTION: INGRESS
PRIORITY: 1000
ALLOW: tcp:31000
DENY:
DISABLED: False

이제 설정이 완료되었으니 포트 전달 없이 클러스터 밖에서 안전한 모놀리식 서비스를 조회할 수 있습니다.

먼저 노드 1개의 외부 IP 주소를 가져옵니다.

$ gcloud compute instances list
NAME: gke-io-default-pool-0935d588-2p36
ZONE: us-central1-b
MACHINE_TYPE: e2-medium
PREEMPTIBLE:
INTERNAL_IP: 10.128.0.4
EXTERNAL_IP: 35.202.160.183
STATUS: RUNNING

NAME: gke-io-default-pool-0935d588-wnl3
ZONE: us-central1-b
MACHINE_TYPE: e2-medium
PREEMPTIBLE:
INTERNAL_IP: 10.128.0.3
EXTERNAL_IP: 35.184.250.47
STATUS: RUNNING

NAME: gke-io-default-pool-0935d588-wsgq
ZONE: us-central1-b
MACHINE_TYPE: e2-medium
PREEMPTIBLE:
INTERNAL_IP: 10.128.0.5
EXTERNAL_IP: 34.122.69.115
STATUS: RUNNING

이제 curl을 사용하여 보안이 설정된 모놀리식 서비스를 조회해 봅니다.

$ curl -k https://<EXTERNAL_IP>:31000

이런! 시간이 초과되었습니다. 왜 그럴까요?

이제 배운 내용을 간단하게 확인해 보겠습니다.

다음 명령어를 사용하여 아래 질문에 답하세요.

$ kubectl get services monolith
NAME       TYPE       CLUSTER-IP     EXTERNAL-IP   PORT(S)         AGE
monolith   NodePort   10.72.15.207   <none>        443:31000/TCP   5m29s

$ kubectl describe services monolith
Name:                     monolith
Namespace:                default
Labels:                   <none>
Annotations:              cloud.google.com/neg: {"ingress":true}
Selector:                 app=monolith,secure=enabled
Type:                     NodePort
IP Family Policy:         SingleStack
IP Families:              IPv4
IP:                       10.72.15.207
IPs:                      10.72.15.207
Port:                     <unset>  443/TCP
TargetPort:               443/TCP
NodePort:                 <unset>  31000/TCP
Endpoints:                <none>
Session Affinity:         None
External Traffic Policy:  Cluster
Events:                   <none>

질문:

  • 모놀리식 서비스가 응답하지 않은 이유는 무엇인가요?
  • 모놀리식 서비스는 몇 개의 엔드포인트를 가지고 있나요?
  • 모놀리식 서비스가 포드를 감지하게 하려면 포드에 어떤 라벨이 지정되어 있어야 하나요?

힌트: 라벨에 관한 질문입니다. 다음 섹션에서 이 문제를 해결하겠습니다.

포드에 라벨 추가하기

현재 모놀리식 서비스에는 엔드포인트가 없습니다. 이와 같은 문제를 해결하는 방법 중 하나는 라벨 쿼리와 함께 kubectl get pods 명령어를 사용하는 것입니다

모놀리식 라벨이 지정되어 실행되는 포드 몇 개가 있다는 사실을 확인할 수 있습니다.

$ kubectl get pods -l "app=monolith"

NAME              READY   STATUS    RESTARTS   AGE
monolith          1/1     Running   0          20m
secure-monolith   2/2     Running   0          8m13s

그런데 'app=monolith'와 'secure=enabled'는 어떤가요?

$ kubectl get pods -l "app=monolith,secure=enabled"
No resources found in default namespace.

이 라벨 쿼리로는 결과가 출력되지 않습니다. 'secure=enabled' 라벨을 추가해야 할 것 같습니다.

kubectl label 명령어를 사용하여 보안이 설정된 모놀리식 포드에 누락된 secure=enabled 라벨을 추가합니다. 그런 다음 라벨이 업데이트되었는지 확인합니다.

$ kubectl label pods secure-monolith 'secure=enabled'
pod/secure-monolith labeled

$ kubectl get pods secure-monolith --show-labels
NAME              READY   STATUS    RESTARTS   AGE     LABELS
secure-monolith   2/2     Running   0          8m55s   app=monolith,secure=enabled

이제 포드에 정확한 라벨을 지정했으니 모놀리식 서비스의 엔드포인트 목록을 확인합니다.

$ kubectl describe services monolith | grep Endpoints
Endpoints:                10.68.0.7:443

엔드포인트가 하나 있습니다.

노드 중 하나를 조회하여 이 엔드포인트를 테스트해 보겠습니다.

$ gcloud compute instances list
$ curl -k https://<EXTERNAL_IP>:31000
{"message":"Hello"}

좋습니다. 성공입니다.

Kubernetes로 애플리케이션 배포하기

이 실습의 목표는 프로덕션의 컨테이너를 확장하고 관리하는 것입니다. 이와 같은 상황에서 디플로이먼트가 유용합니다. 디플로이먼트는 실행 중인 포드의 개수가 사용자가 명시한 포드 개수와 동일하게 만드는 선언적 방식입니다.
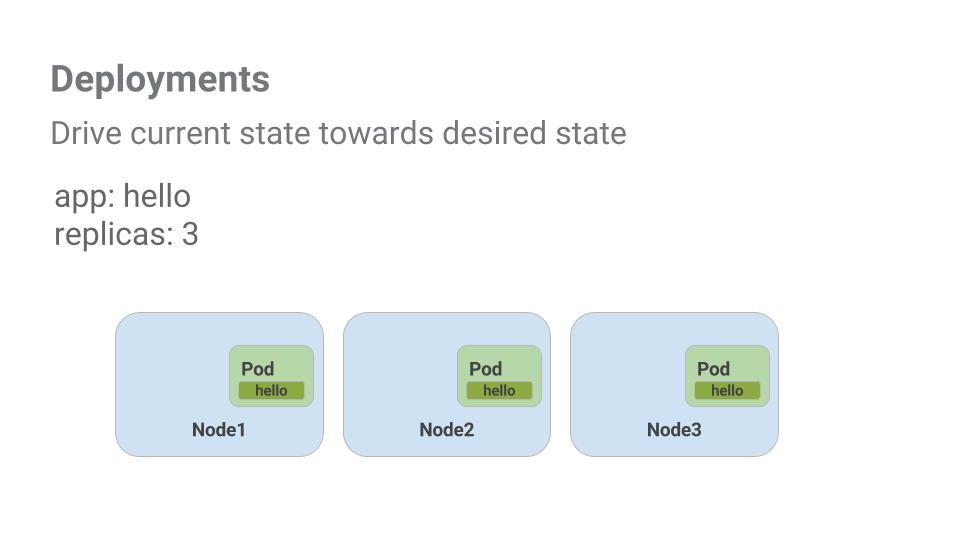
f96989028fa7d280.png배포의 주요 이점은 pod 관리에서 낮은 수준의 세부정보를 추상화하는 데 있습니다. 배포는 백그라운드에서 복제본 집합을 사용하여 pod의 시작 및 중지를 관리합니다. Pod를 업데이트하거나 확장해야 하는 경우 배포가 이를 처리합니다. 또한 디플로이먼트는 어떤 이유로든 포드가 중지되면 재시작을 담당하여 처리합니다.

간단한 예를 살펴보겠습니다.
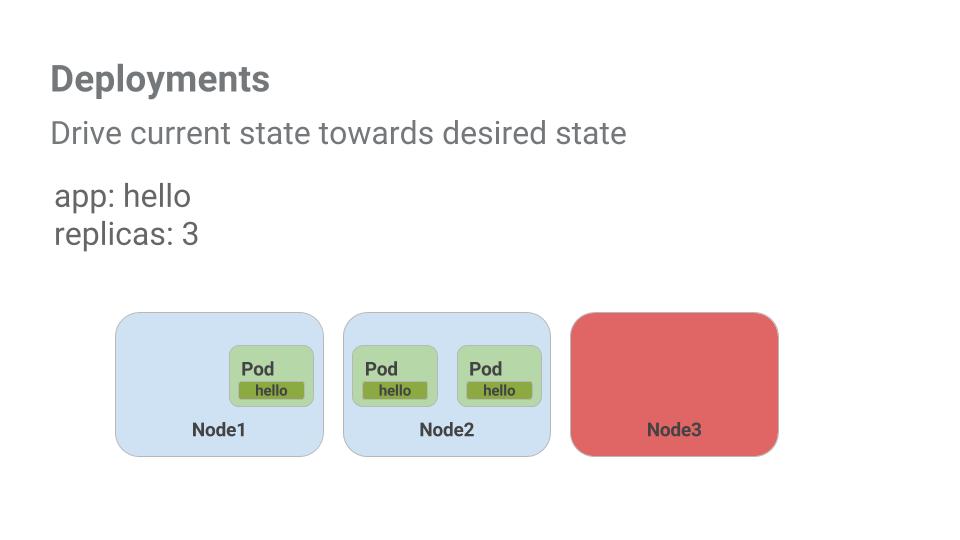
b2e31eed284e4cfe.png

포드는 생성 기반 노드의 전체 기간과 연결되어 있습니다. 위 예시에서 Node3이 중단되면서 포드도 중단되었습니다. 직접 새로운 포드를 만들고 이를 위한 노드를 찾는 대신, 디플로이먼트가 새로운 포드를 만들고 Node2에서 실행했습니다.

아주 편리한 방식입니다.

포드와 서비스에 관해 배운 모든 지식을 바탕으로, 이제 디플로이먼트를 사용하여 모놀리식 애플리케이션을 작은 서비스로 분할해 보겠습니다.

디플로이먼트 만들기

모놀리식 앱을 다음의 3가지 부분으로 나눕니다.

  • auth - 인증된 사용자를 위한 JWT 토큰을 생성합니다.
  • hello - 인증된 사용자를 안내합니다.
  • frontend - 트래픽을 auth 및 hello 서비스로 전달합니다.

각 서비스용 디플로이먼트를 만들 준비가 됐습니다. 그런 다음 auth 및 hello 디플로이먼트용 내부 서비스와 frontend 디플로이먼트용 외부 서비스를 정의하겠습니다. 이렇게 하면 모놀리식과 같은 방식으로 마이크로서비스와 상호작용할 수 있으며, 각 서비스를 독립적으로 확장하고 배포할 수 있습니다.

auth 디플로이먼트 구성 파일을 검토하는 것으로 시작하겠습니다.

cat deployments/auth.yaml

(출력)

apiVersion: apps/v1
kind: Deployment
metadata:
  name: auth
spec:
  selector:
    matchlabels:
      app: auth
  replicas: 1
  template:
    metadata:
      labels:
        app: auth
        track: stable
    spec:
      containers:
        - name: auth
          image: "kelseyhightower/auth:2.0.0"
          ports:
            - name: http
              containerPort: 80
            - name: health
              containerPort: 81
...

디플로이먼트가 복제본 1개를 만들며, 여기서는 auth 컨테이너 2.0.0 버전을 사용합니다.

kubectl create 명령어를 실행하여 auth 디플로이먼트를 만들면 디플로이먼트 매니페스트 데이터를 준수하는 포드가 만들어집니다. 즉, 복제본 필드에 명시된 숫자를 변경하여 포드 숫자를 조정할 수 있습니다.

이제 디플로이먼트 개체를 만듭니다.

$ kubectl create -f deployments/auth.yaml
deployment.apps/auth created

또한 auth 디플로이먼트용 서비스를 만듭니다. kubectl create 명령어를 사용하여 auth 서비스를 만듭니다.

$ kubectl create -f services/auth.yaml
service/auth created

hello 디플로이먼트 만들기와 노출도 위와 동일하게 진행합니다.

$ kubectl create -f deployments/hello.yaml
$ kubectl create -f services/hello.yaml

frontend 디플로이먼트 만들기와 노출 또한 위와 동일하게 진행합니다.

$ kubectl create configmap nginx-frontend-conf --from-file=nginx/frontend.conf
configmap/nginx-frontend-conf created
$ kubectl create -f deployments/frontend.yaml
deployment.apps/frontend created
$ kubectl create -f services/frontend.yaml
service/frontend created

frontend를 만들기 위해 컨테이너에 구성 데이터를 보관해야 하기 때문에 추가 단계를 진행합니다.

외부 IP 주소를 확보하고 curl 명령어를 사용하여 frontend와 상호작용합니다.

$ kubectl get services frontend

NAME       TYPE           CLUSTER-IP   EXTERNAL-IP   PORT(S)         AGE
frontend   LoadBalancer   10.72.5.5    <pending>     443:32585/TCP   12s

참고: 외부 IP 주소가 생성되는 데 1분 정도 걸릴 수 있습니다. EXTERNAL-IP 열 상태가 보류 중인 경우 위의 명령을 다시 실행합니다.

$ curl -k https://<EXTERNAL-IP>
{"message":"Hello"}

그러면 hello 응답을 받게 됩니다.

ac89564fa3705b3a.png 6d0798e24a18671b.png

퀘스트 완료하기

이 사용자 주도형 실습은 Qwiklabs Cloud ArchitectureKubernetes in the Google Cloud 퀘스트의 일부입니다. 퀘스트는 교육 과정을 구성하는 일련의 관련 실습입니다. 이 퀘스트를 완료하면 위의 배지를 얻고 수료를 인증할 수 있습니다. 배지를 공개하고 온라인 이력서 또는 소셜 미디어 계정에 연결할 수 있습니다. 이 실습을 완료했다면 퀘스트에 등록하여 즉시 수료 크레딧을 받으세요. 다른 Qwiklabs 퀘스트도 참조해 보세요.

Kubernetes 기술을 시연하고 지식을 검증 할 실습 챌린지 랩을 찾고 계십니까? 이 퀘스트를 완료하면이 추가 챌린지 실습을 완료하여 독점 Google Cloud 디지털 배지를 받으세요.

다음 실습 참여하기

다음 실습 중 하나를 통해 퀘스트를 계속 진행하세요.

반응형

Google Kubernetes Engine(GKE)에서는 Google 인프라를 사용하여 컨테이너화된 애플리케이션을 배포, 관리 및 확장할 수 있는 관리형 환경을 제공합니다. Kubernetes Engine 환경은 컨테이너 클러스터를 형성하도록 그룹화된 여러 머신(구체적으로 Compute Engine 인스턴스)으로 구성되어 있습니다. 이번 실습에서는 GKE를 사용하여 직접 컨테이너를 생성하고 애플리케이션을 배포해 봅니다.

Google Kubernetes Engine을 사용한 클러스터 조정

GKE 클러스터는 Kubernetes 오픈소스 클러스터 관리 시스템을 기반으로 합니다. Kubernetes는 컨테이너 클러스터와 상호작용할 수 있는 메커니즘을 제공합니다. Kubernetes 명령어와 리소스를 사용하면 애플리케이션을 배포 및 관리하고 관리 작업을 수행하고 정책을 설정하며 배포된 워크로드의 상태를 모니터링할 수 있습니다.

Kubernetes는 널리 쓰이는 Google 서비스와 동일한 설계 원칙을 따르고 있어 자동 관리, 애플리케이션 컨테이너의 모니터링 및 활성 여부 프로브, 자동 확장, 순차적 업데이트와 같은 이점을 그대로 누릴 수 있습니다. 10년 이상 컨테이너로 프로덕션 워크로드를 실행해 온 Google의 경험이 녹아든 기술을 활용하여 컨테이너 클러스터에서 애플리케이션을 실행할 수 있습니다.

Google Cloud 기반 Kubernetes

GKE 클러스터를 실행하면 Google Cloud의 고급 클러스터 관리 기능을 활용할 수 있습니다. 예를 들면 다음과 같습니다.

Kubernetes 관련 기본 사항을 배웠으므로 이제 GKE를 사용하여 컨테이너화된 애플리케이션을 30분 이내에 배포하는 방법을 알아봅니다. 실습 환경을 설정하려면 아래 단계를 따르세요.

작업 1. 기본 컴퓨팅 영역 설정

컴퓨팅 영역이란 클러스터와 리소스가 존재하는 리전 내 대략적인 위치를 의미합니다. 예를 들어 us-central1-aus-central1 리전에 속한 영역입니다. Cloud Shell에서 새 세션을 시작합니다.

  1. 기본 컴퓨팅 리전 설정
  2. $ gcloud config set compute/region us-west3 Updated property [compute/region].
  3. 기본 컴퓨팅 영역 설정
  4. $ gcloud config set compute/zone us-west3-b Updated property [compute/zone].

작업 2. GKE 클러스터 만들기

클러스터는 1개 이상의 클러스터 마스터 머신과 노드라는 여러 작업자 머신으로 구성됩니다. 노드란 클러스터를 구성하기 위해 필요한 Kubernetes 프로세스를 실행하는 Compute Engine 가상 머신(VM) 인스턴스입니다.

참고: 클러스터 이름은 영문자로 시작하고 영숫자 문자로 끝나야 하며 40자(영문 기준) 이하여야 합니다.

다음 명령어를 실행합니다.

  1. 클러스터 만들기
    $ gcloud container clusters create --machine-type=e2-medium --zone=us-west3-b lab-cluster
    

Default change: VPC-native is the default mode during cluster creation for versions greater than 1.21.0-gke.1500. To create advanced routes based clusters, please pass the --no-enable-ip-alias flag
Default change: During creation of nodepools or autoscaling configuration changes for cluster versions greater than 1.24.1-gke.800 a default location policy is applied. For Spot and PVM it defaults to ANY, and for all other VM kinds a BALANCED policy is used. To change the default values use the --location-policy flag.
Note: Your Pod address range (--cluster-ipv4-cidr) can accommodate at most 1008 node(s).
Creating cluster lab-cluster in us-west3-b... Cluster is being deployed...working..

NAME: lab-cluster
LOCATION: us-west3-b
MASTER_VERSION: 1.22.8-gke.202
MASTER_IP: 34.67.240.12
MACHINE_TYPE: e2-medium
NODE_VERSION: 1.22.8-gke.202
NUM_NODES: 3
STATUS: RUNNING


출력에 표시되는 경고는 모두 무시해도 괜찮습니다. 클러스터 생성이 완료되기까지 **몇 분**이 걸릴 수 있습니다.(나는 5분 넘게 걸림)

## 작업 3. 클러스터의 사용자 인증 정보 얻기

클러스터를 만든 후 클러스터와 상호작용하려면 사용자 인증 정보가 필요합니다.

1. **클러스터에 인증**:

```bash
$ gcloud container clusters get-credentials lab-cluster

Fetching cluster endpoint and auth data.
kubeconfig entry generated for lab-cluster.

작업 4. 클러스터에 애플리케이션 배포

이제 클러스터에 컨테이너화된 애플리케이션을 배포할 수 있습니다. 이번 실습에서는 hello-app을 클러스터에서 실행합니다.

GKE는 Kubernetes 객체를 사용하여 클러스터의 리소스를 만들고 관리합니다. 웹 서버와 같은 스테이트리스(Stateless) 애플리케이션을 배포할 때는 Kubernetes에서 배포 객체를 사용합니다. 서비스 객체는 인터넷에서 애플리케이션에 액세스하기 위한 규칙과 부하 분산 방식을 정의합니다.

  1. hello-app 컨테이너 이미지에서 새 배포 hello-server를 생성하려면 다음 kubectl create 명령어를 실행합니다.
    $ kubectl create deployment hello-server --image=gcr.io/google-samples/hello-app:1.0
    

deployment.apps/hello-server created


2. 애플리케이션을 외부 트래픽에 노출할 수 있는 Kubernetes 리소스인 **Kubernetes Service를 생성**하려면 다음 [kubectl expose](https://kubernetes.io/docs/reference/generated/kubectl/kubectl-commands#expose) 명령어를 실행합니다.

```bash
$ kubectl expose deployment hello-server --type=LoadBalancer --port 8080

이 명령어에서

  • --port는 컨테이너가 노출될 포트를 지정합니다.
  • type="LoadBalancer"는 컨테이너의 Compute Engine 부하 분산기를 생성합니다.
  1. hello-server 서비스를 검사하려면 kubectl get을 실행합니다.
    $ kubectl get service
    

NAME TYPE CLUSTER-IP EXTERNAL-IP PORT(S) AGE
hello-server LoadBalancer 10.4.9.208 34.106.132.253 8080:30570/TCP 54s
kubernetes ClusterIP 10.4.0.1 443/TCP 5m29s


> **참고:** 외부 IP 주소가 생성되기까지 1분 정도 걸릴 수 있습니다. `EXTERNAL-IP` 열이 **대기중** 상태이면 위 명령어를 다시 실행하세요.

4. 웹브라우저에서 애플리케이션을 보려면 새 탭을 열고 다음 주소를 입력합니다. 여기서 `[EXTERNAL IP]`는 `hello-server`의 `EXTERNAL-IP`로 바꿉니다.
```bash
http://[EXTERNAL-IP]:8080  -- browser로 접속

Hello, world!
Version: 1.0.0
Hostname: hello-server-5597d96dd4-v5mmm

작업 5. 클러스터 삭제

  1. 클러스터를 삭제하려면 다음 명령어를 실행합니다.
    $ gcloud container clusters delete lab-cluster 
  • [lab-cluster] in [us-west3-b]

Do you want to continue (Y/n)?

Deleting cluster lab-cluster...working


메시지가 표시되면 **Y**를 입력하여 확인합니다.

클러스터를 삭제하는 데 몇 분 정도 걸릴 수 있습니다. Google Kubernetes Engine(GKE)에서 GKE 클러스터 삭제하기에 대한 자세한 내용은 [클러스터 삭제](https://cloud.google.com/kubernetes-engine/docs/how-to/deleting-a-cluster)를 참조하세요.
반응형

이 실습은 입문용이며, Docker 및 컨테이너 사용 경험이 거의 없거나 전혀 없는 사용자를 대상으로 합니다. Cloud Shell 및 명령줄을 잘 안다면 좋지만 필수 사항은 아닙니다. 이 서비스 영역에 관해 좀 더 고급 단계의 자료를 찾고 있는 경우 다음 실습을 확인하세요.

준비가 됐으면 아래로 스크롤하여 실습 환경을 설정하세요.

  1. qwiklabs-gcp-03-b18cb4608533

Hello from Docker!
This message shows that your installation appears to be working correctly.

To generate this message, Docker took the following steps:

  1. The Docker client contacted the Docker daemon.
  2. The Docker daemon pulled the "hello-world" image from the Docker Hub.
    (amd64)
  3. The Docker daemon created a new container from that image which runs the
    executable that produces the output you are currently reading.
  4. The Docker daemon streamed that output to the Docker client, which sent it
    to your terminal.

To try something more ambitious, you can run an Ubuntu container with:
$ docker run -it ubuntu bash

Share images, automate workflows, and more with a free Docker ID:
https://hub.docker.com/

For more examples and ideas, visit:
https://docs.docker.com/get-started/


### docker build
```bash
cat > Dockerfile <<EOF
# Use an official Node runtime as the parent image
FROM node:lts
# Set the working directory in the container to /app
WORKDIR /app
# Copy the current directory contents into the container at /app
ADD . /app
# Make the container's port 80 available to the outside world
EXPOSE 80
# Run app.js using node when the container launches
CMD ["node", "app.js"]
EOF

이 파일에서는 Docker 데몬에 이미지를 빌드하는 방법을 안내합니다.

  • 첫 번째 줄은 기본 상위 이미지를 지정합니다. 이 경우 기본 상위 이미지는 노드 버전 장기적 지원(LTS)의 공식 Docker 이미지입니다.
  • 두 번째 줄에서 컨테이너의 (현재) 작업 디렉터리를 설정합니다.
  • 세 번째 줄에서는 현재 디렉터리의 콘텐츠("."로 표시)를 컨테이너에 추가합니다.
  • 그런 다음 컨테이너의 포트를 공개하여 해당 포트에서의 연결을 허용하고 마지막으로 노드 명령어를 실행하여 애플리케이션을 시작합니다.

참고: 시간을 내어 Dockerfile 명령어 참조를 검토하고 Dockerfile의 각 줄을 숙지하세요.

  1. 다음 명령어를 실행하여 노드 애플리케이션을 생성합니다.
$ cat > app.js <<EOF
const http = require('http');
const hostname = '0.0.0.0';
const port = 80;
const server = http.createServer((req, res) => {
    res.statusCode = 200;
    res.setHeader('Content-Type', 'text/plain');
    res.end('Hello World\n');
});
server.listen(port, hostname, () => {
    console.log('Server running at http://%s:%s/', hostname, port);
});
process.on('SIGINT', function() {
    console.log('Caught interrupt signal and will exit');
    process.exit();
});
EOF

포트 80에서 수신 대기하고 'Hello World'를 반환하는 간단한 HTTP 서버입니다.

이제 이미지를 빌드합니다.

  1. 다음 명령어를 Dockerfile이 있는 디렉터리에서 실행해야 합니다. 현재 디렉터리를 의미하는 "."에 다시 한번 유의하세요.
$ docker build -t node-app:0.1 .

[+] Building 12.3s (4/7)
 => [internal] load build definition from Dockerfile                                                                                                                                  0.1s
 => => transferring dockerfile: 393B                                                                                                                                                  0.0s
 => [internal] load .dockerignore                                                                                                                                                     0.1s
 => => transferring context: 2B
...

-tname:tag 문법을 사용하여 이미지의 이름과 태그를 지정하는 역할을 합니다. 이미지 이름은 node-app이고 태그0.1입니다. Docker 이미지를 빌드할 때는 태그를 사용하는 것이 좋습니다. 태그를 지정하지 않으면 태그가 기본값인 latest로 지정되어 최신 이미지와 기존 이미지를 구분하기 어려워집니다. 또한 이미지를 빌드할 때 위 Dockerfile의 각 행을 통해 중간 컨테이너 레이어가 만들어지는 방식을 확인하세요.

  1. 이제 다음 명령어를 실행하여 빌드한 이미지를 봅니다.
$ docker images

node는 기본 이미지이고 node-app은 빌드한 이미지입니다. node를 삭제하려면 우선 node-app을 삭제해야 합니다. 이미지의 크기는 VM에 비해 상대적으로 작습니다. node:slimnode:alpine과 같은 노드 이미지의 다른 버전을 사용하면 더 작은 이미지를 제공하여 이식성을 높일 수 있습니다. 컨테이너 크기 줄이기에 관해서는 고급 주제에서 자세히 설명하겠습니다. 노드의 공식 저장소에서 모든 버전을 확인할 수 있습니다.

docker run

  1. 이 모듈에서는 다음 코드를 사용하여 빌드한 이미지를 기반으로 하는 컨테이너를 실행합니다.
$ docker run -p 4000:80 --name my-app node-app:0.1

--name 플래그를 사용하면 원하는 경우 컨테이너 이름을 지정할 수 있습니다. -p는 Docker가 컨테이너의 포트 80에 호스트의 포트 4000을 매핑하도록 지시하는 플래그입니다. 이제 http://localhost:4000에서 서버에 접속할 수 있습니다. 포트 매핑이 없으면 localhost에서 컨테이너에 접속할 수 없습니다.

  1. 다른 터미널을 열고(Cloud Shell에서 + 아이콘을 클릭) 서버를 테스트합니다.
$ curl http://localhost:4000

초기 터미널이 실행되는 동안 컨테이너가 실행됩니다. 컨테이너를 터미널 세션에 종속시키지 않고 백그라운드에서 실행하려면 -d 플래그를 지정해야 합니다.

  1. 초기 터미널을 닫은 후 다음 명령어를 실행하여 컨테이너를 중지하고 삭제합니다.
$ docker stop my-app && docker rm my-app
  1. 이제 다음 명령어를 실행하여 백그라운드에서 컨테이너를 시작합니다.
$ docker run -p 4000:80 --name my-app -d node-app:0.1
docker ps

이제 애플리케이션을 수정합니다.

  1. Cloud Shell에서 앞서 실습에서 만든 테스트 디렉터리를 엽니다.
$ cd test
  1. 원하는 텍스트 편집기(예: nano 또는 vim)로 app.js를 편집하고 'Hello World'를 다른 문자열로 바꿉니다.
....
const server = http.createServer((req, res) => {
    res.statusCode = 200;
    res.setHeader('Content-Type', 'text/plain');
    res.end('Welcome to Cloud\n');
});
....
  1. 이 새 이미지를 빌드하고 0.2로 태그를 지정합니다.
$ docker build -t node-app:0.2 .

2단계에서 기존 캐시 레이어를 사용하고 있음을 확인할 수 있습니다. 3단계 이후부터는 app.js를 변경했기 때문에 레이어가 수정되었습니다.

  1. 새 이미지 버전으로 다른 컨테이너를 실행합니다. 이때 호스트 포트를 80 대신 8080으로 매핑하는 방법을 확인하세요. 호스트 포트 4000은 이미 사용 중이므로 사용할 수 없습니다.
$ docker run -p 8080:80 --name my-app-2 -d node-app:0.2
docker ps
  1. 컨테이너를 테스트합니다.
  2. 이제 처음 작성한 컨테이너를 테스트합니다.
    $ curl http://localhost:4000

Debug

  1. docker logs [container_id]를 사용하여 컨테이너의 로그를 볼 수 있습니다. 컨테이너가 실행 중일 때 로그 출력을 확인하려면 -f 옵션을 사용합니다.
$ docker logs -f [container_id]

Server running at http://0.0.0.0:80/

실행 중인 컨테이너에서 대화형 Bash 세션을 시작해야 할 수 있습니다.

  1. 이 경우 docker exec를 사용합니다. 다른 터미널을 열고(Cloud Shell에서 + 아이콘을 클릭) 다음 명령어를 입력합니다.
$ docker exec -it [container_id] bash

root@27baedf72cfe:/app#

-it 플래그는 pseudo-tty를 할당하고 stdin을 열린 상태로 유지하여 컨테이너와 상호작용할 수 있도록 합니다. Dockerfile에 지정된 WORKDIR 디렉터리(/app)에서 bash가 실행된 것을 확인할 수 있습니다. 이제 디버깅할 컨테이너 내에서 대화형 셸 세션을 사용할 수 있습니다.

  1. Bash 세션을 종료합니다.
$ exit
  1. Docker inspect를 통해 Docker에서 컨테이너의 메타데이터를 검토할 수 있습니다.
  2. $ docker inspect [container_id]
  3. --format을 사용하여 반환된 JSON의 특정 필드를 검사합니다. 다음은 예시입니다.
$ docker inspect --format='{{range .NetworkSettings.Networks}}{{.IPAddress}}{{end}}' [container_id]

172.18.0.3

Deploy

이제 이미지를 Google Artifact Registry로 푸시합니다. 그런 다음 모든 컨테이너와 이미지를 삭제하여 새로운 환경을 시뮬레이션하고 컨테이너를 가져와서 실행합니다. 이를 통해 Docker 컨테이너의 이식성을 확인할 수 있습니다.

Artifact Registry에서 호스팅하는 비공개 레지스트리에 이미지를 푸시하려면 이미지에 레지스트리 이름으로 태그를 지정해야 합니다. 형식은 <regional-repository>-docker.pkg.dev/my-project/my-repo/my-image입니다.

대상 Docker 저장소 만들기

이미지를 푸시하려면 먼저 저장소를 만들어야 합니다. 이미지를 푸시해도 저장소 만들기가 트리거되지 않으며 Cloud Build 서비스 계정에는 저장소를 만들 권한이 없습니다.

  1. 탐색 메뉴의 CI/CD에서 Artifact Registry > 저장소로 이동합니다.
  2. 저장소 만들기를 클릭합니다.
  3. 저장소 이름으로 my-repository를 지정합니다.
  4. 형식으로 Docker를 선택합니다.
  5. 위치 유형에서 리전을 선택한 후 us-central1 (Iowa) 위치를 선택합니다.
  6. 만들기를 클릭합니다.

인증 구성하기

이미지를 푸시하거나 가져오려면 먼저 Docker가 Artifact Registry에 대한 요청을 인증하는 데 Google Cloud CLI를 사용하도록 구성해야 합니다.

  1. us-central1 리전의 Docker 저장소에 인증을 설정하려면 Cloud Shell에서 다음 명령어를 실행합니다.
    $ gcloud auth configure-docker us-central1-docker.pkg.dev
    

WARNING: Your config file at [/home/student_02_32afeda26918/.docker/config.json] contains these credential helper entries:

{
"credHelpers": {
"gcr.io": "gcloud",
"us.gcr.io": "gcloud",
"eu.gcr.io": "gcloud",
"asia.gcr.io": "gcloud",
"staging-k8s.gcr.io": "gcloud",
"marketplace.gcr.io": "gcloud"
}
}
Adding credentials for: us-central1-docker.pkg.dev
After update, the following will be written to your Docker config file located at [/home/student_02_32afeda26918/.docker/config.json]:
{
"credHelpers": {
"gcr.io": "gcloud",
"us.gcr.io": "gcloud",
"eu.gcr.io": "gcloud",
"asia.gcr.io": "gcloud",
"staging-k8s.gcr.io": "gcloud",
"marketplace.gcr.io": "gcloud",
"us-central1-docker.pkg.dev": "gcloud"
}
}

Do you want to continue (Y/n)?

Docker configuration file updated.


2.  메시지가 표시되면 `Y`를 입력합니다.

이 명령어는 Docker 구성을 업데이트합니다. 이제 Google Cloud 프로젝트의 Artifact Registry와 연결하여 이미지를 푸시하고 가져올 수 있습니다.

#### 컨테이너를 Artifact Registry로 푸시하기

1.  다음 명령어를 실행하여 프로젝트 ID를 설정하고 Dockerfile이 포함된 디렉터리로 변경합니다.
```bash
$ export PROJECT_ID=$(gcloud config get-value project)

Your active configuration is: [cloudshell-13525]

$ cd ~/test
  1. 명령어를 실행하여 node-app:0.2에 태그를 지정합니다.
  2. $ docker build -t us-central1-docker.pkg.dev/$PROJECT_ID/my-repository/node-app:0.2 . => [internal] load build definition from Dockerfile 0.0s => => transferring dockerfile: 393B 0.0s => [internal] load .dockerignore 0.0s => => transferring context: 2B 0.0s => [internal] load metadata for docker.io/library/node:lts 0.4s => [1/3] FROM docker.io/library/node:lts@sha256:671ee8d49ce2a691fc3082203c5deb9522e0c80042aa0ff40c07f4a25e63668a 0.0s => [internal] load build context 0.0s => => transferring context: 58B 0.0s => CACHED [2/3] WORKDIR /app 0.0s => CACHED [3/3] ADD . /app 0.0s => exporting to image 0.0s => => exporting layers 0.0s => => writing image sha256:36c2988fda0026b9ea6c7b151eb27f6672a5855ffa0292741c3456c21101b963 0.0s => => naming to us-central1-docker.pkg.dev/qwiklabs-gcp-03-b18cb4608533/my-repository/node-app:0.2
  3. 다음 명령어를 실행하여 빌드된 Docker 이미지를 확인합니다.
  4. $ docker images

REPOSITORY TAG IMAGE ID CREATED SIZE
node-app 0.2 36c2988fda00 15 minutes ago 997MB
us-central1-docker.pkg.dev/qwiklabs-gcp-03-b18cb4608533/my-repository/node-app 0.2 36c2988fda00 15 minutes ago 997MB
node-app 0.1 e863a062c844 21 minutes ago 997MB
hello-world latest feb5d9fea6a5 19 months ago 13.3kB
student_02_32afeda26918@cloudshell:~/test (qwiklabs-gcp-03-b18cb4608533)$ docker push us-central1-docker.pkg.dev/$PROJECT_ID/my-repository


4. 이 이미지를 Artifact Registry로 푸시합니다.

```bash
$ docker push us-central1-docker.pkg.dev/$PROJECT_ID/my-repository/node-app:0.2
  1. 빌드가 완료되면 탐색 메뉴의 CI/CD에서 Artifact Registry > 저장소로 이동합니다.
  2. my-repository를 클릭합니다. node-app Docker 컨테이너가 생성된 것을 볼 수 있습니다.

이미지 테스트하기

새로운 VM을 시작하고 SSH로 새 VM에 접속한 다음 gcloud를 설치할 수도 있지만 여기서는 간단하게 모든 컨테이너와 이미지를 삭제하여 새로운 환경을 시뮬레이션하겠습니다.

  1. 모든 컨테이너를 중지하고 삭제합니다.
    $ docker stop $(docker ps -q)
    $ docker rm $(docker ps -aq)

노드 이미지를 삭제하기 전에 (node:lts의) 하위 이미지를 삭제해야 합니다.

  1. 다음 명령어를 실행하여 모든 Docker 이미지를 삭제합니다.
    $ docker rmi us-central1-docker.pkg.dev/$PROJECT_ID/my-repository/node-app:0.2
    $ docker rmi node:lts
    $ docker rmi -f $(docker images -aq) # remove remaining images
    $ docker images

이제 새로운 환경이나 다름없습니다.

  1. 이미지를 가져와서 실행합니다.
    $ docker pull us-central1-docker.pkg.dev/$PROJECT_ID/my-repository/node-app:0.2
    $ docker run -p 4000:80 -d us-central1-docker.pkg.dev/$PROJECT_ID/my-repository/node-app:0.2
    $ curl http://localhost:4000

완료된 작업 테스트하기

내 진행 상황 확인하기를 클릭하여 실행한 작업을 확인합니다. 컨테이너 이미지를 Artifact Registry에 게시하면 평가 점수가 표시됩니다.

반응형

Apache Mesos vs Kubernetes

주의할 점은 Kubernetes를 Mesos와 직접 비교하는 것은 완전히 공정하지 않다는 것입니다. 우리가 추구하는 대부분의 컨테이너 오케스트레이션 기능은 Marathon과 같은 Mesos 프레임워크 중 하나에서 제공됩니다. 따라서 올바른 관점에서 상황을 유지하기 위해 Kubernetes를 직접 Mesos가 아닌 Marathon과 비교하려고 합니다.

이러한 시스템의 원하는 속성 중 일부를 기반으로 이러한 오케스트레이션 시스템을 비교할 것입니다.

지원되는 워크로드

Mesos는 컨테이너화되거나 비컨테이너화될 수 있는 다양한 유형의 워크로드를 처리하도록 설계되었습니다. 우리가 사용하는 프레임워크에 따라 다릅니다. 우리가 보았듯이 Marathon과 같은 프레임워크를 사용하여 Mesos에서 컨테이너화된 워크로드를 지원하는 것은 매우 쉽습니다.

반면 Kubernetes는 컨테이너화된 워크로드에서만 작동합니다. 가장 광범위하게 Docker 컨테이너와 함께 사용하지만 Rkt와 같은 다른 컨테이너 런타임을 지원합니다. 앞으로 Kubernetes는 더 많은 유형의 워크로드를 지원할 수 있습니다.

확장성(Scalability) 지원

Marathon은 애플리케이션 정의 또는 사용자 인터페이스를 통한 확장을 지원합니다. Autoscaling은 Marathon에서도 지원됩니다. 또한 모든 종속성을 자동으로 확장하는 애플리케이션 그룹을 확장할 수 있습니다.

Pod는 Kubernetes의 기본 실행 단위입니다. Pod는 Deployment에서 관리할 때 확장할 수 있습니다. 이것이 Pod가 항상 배포로 정의되는 이유입니다. 스케일링은 수동 또는 자동일 수 있습니다.

고가용성(High Availability) 처리

Marathon의 애플리케이션 인스턴스는 고가용성을 제공하는 Mesos 에이전트에 분산됩니다. 일반적으로 Mesos 클러스터는 여러 에이전트로 구성됩니다. 또한 ZooKeeper는 쿼럼 및 리더 선택을 통해 Mesos 클러스터에 고가용성을 제공합니다.

마찬가지로 Kubernetes의 포드는 여러 노드에 복제되어 고가용성을 제공합니다. 일반적으로 Kubernetes 클러스터는 여러 작업자 노드로 구성됩니다. 또한 클러스터에는 여러 마스터가 있을 수도 있습니다. 따라서 Kubernetes 클러스터는 컨테이너에 고가용성을 제공할 수 있습니다.

서비스 검색 및 로드 밸런싱

Mesos-DNS는 애플리케이션에 대한 서비스 검색 및 기본 로드 밸런싱을 제공합니다. Mesos-DNS는 각 Mesos 작업에 대한 SRV 레코드를 생성하고 작업을 실행하는 시스템의 IP 주소 및 포트로 변환합니다. Marathon 애플리케이션의 경우 Marathon-lb를 사용하여 HAProxy를 사용하여 포트 기반 검색을 제공할 수도 있습니다.

Kubernetes에 배포하면 포드가 동적으로 생성 및 소멸됩니다. 따라서 일반적으로 서비스 검색을 제공하는 Service를 통해 Kubernetes에서 Pod를 노출합니다. Kubernetes의 서비스는 포드에 대한 디스패처 역할을 하므로 로드 밸런싱도 제공합니다.

업그레이드 및 롤백 수행

Marathon에서 애플리케이션 정의에 대한 변경 사항은 배포로 처리됩니다. 배포는 애플리케이션의 시작, 중지, 업그레이드 또는 확장을 지원합니다. Marathon은 또한 최신 버전의 애플리케이션을 배포하기 위한 롤링 시작(Rolling Start)을 지원합니다. 그러나 롤백은 간단하며 일반적으로 업데이트된 정의를 배포해야 합니다.

Kubernetes의 배포는 업그레이드 및 롤백을 지원합니다. 우리는 이전 포드를 새 포드로 교체하면서 취할 배포 전략을 제공할 수 있습니다. 일반적인 전략은 재생성 또는 롤링 업데이트입니다. 배포의 롤아웃 기록은 기본적으로 Kubernetes에서 유지 관리되므로 이전 버전으로 쉽게 롤백할 수 있습니다.

로깅 및 모니터링

Mesos에는 모든 클러스터 구성 요소를 스캔하고 상태 및 기타 Metric과 관련된 데이터를 사용할 수 있도록 하는 진단 유틸리티가 있습니다. 사용 가능한 API를 통해 데이터를 쿼리하고 집계할 수 있습니다. 이 데이터의 대부분은 Prometheus와 같은 외부 도구를 사용하여 수집할 수 있습니다.

Kubernetes는 리소스 Metric 또는 전체 Metric 파이프라인으로 다른 개체와 관련된 자세한 정보를 제공합니다. 일반적인 방법은 Kubernetes 클러스터에 ELK 또는 Prometheus+Grafana와 같은 외부 도구를 배포하는 것입니다. 이러한 도구는 클러스터 Metric을 수집하고 훨씬 사용자 친화적인 방식으로 제공할 수 있습니다.

저장소(Storage)

Mesos에는 상태 저장 애플리케이션을 위한 영구 로컬 볼륨이 있습니다. 예약된 리소스에서만 영구 볼륨을 생성할 수 있습니다. 일부 제한 사항이 있는 외부 저장소도 지원할 수 있습니다. Mesos는 스토리지 공급업체와 컨테이너 오케스트레이션 플랫폼 간의 공통 API 세트인 CSI(Container Storage Interface)에 대한 실험적인 지원을 제공합니다.

Kubernetes는 상태 저장 컨테이너에 대해 여러 유형의 영구 볼륨을 제공합니다. 여기에는 iSCSI, NFS와 같은 스토리지가 포함됩니다. 또한 AWS, GCP와 같은 외부 스토리지도 지원합니다. Kubernetes의 Volume 객체는 이 개념을 지원하며 CSI를 비롯한 다양한 유형으로 제공됩니다.

네트워킹

Mesos의 컨테이너 런타임은 두 가지 유형의 네트워킹 지원, 컨테이너당 IP 및 네트워크 포트 매핑을 제공합니다. Mesos는 컨테이너에 대한 네트워킹 정보를 지정하고 검색하기 위한 공통 인터페이스를 정의합니다. Marathon 애플리케이션은 호스트 모드 또는 브리지 모드에서 네트워크를 정의할 수 있습니다.

Kubernetes의 네트워킹은 각 포드에 고유한 IP를 할당합니다. 이렇게 하면 컨테이너 포트를 호스트 포트에 매핑할 필요가 없습니다. 또한 이러한 포드가 노드 간에 서로 통신할 수 있는 방법을 정의합니다. 이것은 Cilium, Contiv와 같은 네트워크 플러그인에 의해 Kubernetes에서 구현됩니다.

무엇을 사용할까?

명확한 결과를 기대하지만, 어떤 기술이 다른 기술보다 우수하다고 선언하는 것은 전적으로 공정하지 않습니다. 우리가 보았듯이 Kubernetes와 Mesos는 모두 강력한 시스템이며 상당히 경쟁적인 기능을 제공합니다.

그러나 성능은 상당히 중요한 측면입니다. Kubernetes 클러스터는 5000개 노드로 확장할 수 있으며 Marathon on Mesos 클러스터는 최대 10,000개의 에이전트를 지원하는 것으로 알려져 있습니다. 대부분의 실제 사례에서 우리는 그러한 큰 클러스터를 다루지 않을 것입니다.

마지막으로 유연성과 워크로드 유형으로 귀결됩니다. 새로 시작하고 컨테이너화된 워크로드만 사용할 계획이라면 Kubernetes가 더 빠른 솔루션을 제공할 수 있습니다. 그러나 컨테이너와 비컨테이너가 혼합된 기존 워크로드가 있는 경우 Mesos with Marathon이 더 나은 선택이 될 수 있습니다.

다른 대안

Kubernetes와 Apache Mesos는 꽤 강력하지만, 이 공간에서 유일한 시스템은 아닙니다. 우리가 이용할 수 있는 유망한 대안들이 꽤 많이 있습니다.. 자세한 내용은 다루지 않겠지만 몇 가지 항목을 간단히 나열해 보겠습니다.

  • Docker Swarm: 도커 스웜은 도커 컨테이너를 위한 오픈 소스 클러스터링 및 스케줄링 도구이다. Docker 호스트의 클러스터를 관리하는 명령줄 유틸리티가 제공됩니다. Kubernetes나 메소스와 달리 도커 컨테이너에 한정되어 있습니다.
  • Nomad: Nomad는 HashiCorp의 유연한 워크로드 조정자로 컨테이너형 또는 컨테이너형이 아닌 애플리케이션을 관리합니다. Nomad는 Docker 컨테이너와 같은 애플리케이션을 배포하기 위한 선언적 인프라(Infrastructure-as-code)를 활성화합니다.
  • OpenShift: 오픈시프트는 레드햇의 컨테이너 플랫폼으로, 쿠버네티스가 주관하고 관리합니다. OpenShift는 Kubernetes가 제공하는 통합 이미지 레지스트리, 소스-이미지 빌드, 네이티브 네트워킹 솔루션과 같은 많은 기능을 제공합니다.
반응형

본 글은 kubernetes | vagrant and docker 글에서 이어집니다.
https://docs.docker.com/engine/install/ubuntu/#set-up-the-repository 내용을 참고해서 설치합니다.

docker 설치

$ sudo apt-get update

$ sudo apt-get install \
    ca-certificates \
    curl \
    gnupg \
    lsb-release

docker offical GPG key. 등록

$ sudo mkdir -p /etc/apt/keyrings

$ curl -fsSL https://download.docker.com/linux/ubuntu/gpg | sudo gpg --dearmor -o /etc/apt/keyrings/docker.gpg

repository 추가

$ echo \
  "deb [arch=$(dpkg --print-architecture) signed-by=/etc/apt/keyrings/docker.gpg] https://download.docker.com/linux/ubuntu \
  $(lsb_release -cs) stable" | sudo tee /etc/apt/sources.list.d/docker.list > /dev/null

docker-engine 설치

$ sudo apt-get update

$ sudo apt-get -y install docker-ce docker-ce-cli containerd.io docker-compose-plugin
$ sudo systemctl enable docker
$ sudo systemctl start docker

kubenetes 설치

사전준비 사항

  1. 환경설정
  2. kubeaadm, kubectl, kubelet 설치
  3. control-plane 구성
  4. worker node 구성
  5. 설치확인

1, swap 제거

스왑의 비활성화. kubelet이 제대로 작동하게 하려면 반드시 스왑을 사용하지 않도록 설정한다

$ swapoff -a && sed -i '/swap/s/^/#/' /etc/fstab

2. iptables가 브리지된 트래픽을 보게 하기

Letting iptables see bridged traffic

$ cat <<EOF | tee /etc/modules-load.d/k8s.conf
br_netfilter
EOF

$ cat <<EOF | tee /etc/sysctl.d/k8s.conf
net.bridge.bridge-nf-call-ip6tables = 1
net.bridge.bridge-nf-call-iptables = 1
EOF

$ sudo sysctl --system

3. 방화벽 설정

앞단에 방화벽이 대부분 존재합니다. 방화벽을 끄고 사용하도록 합니다.

$ systemctl stop firewalld 
$ systemctl disable firewalld

selinux disabled 설정

4) Set SELinux in permissive mode (effectively disabling it)
# setenforce 0
# sed -i 's/^SELINUX=enforcing$/SELINUX=permissive/' /etc/selinux/config

kubeadm, kubelet, kubectl 설치


$ sudo curl -fsSLo /usr/share/keyrings/kubernetes-archive-keyring.gpg https://packages.cloud.google.com/apt/doc/apt-key.gpg

$ echo "deb [signed-by=/usr/share/keyrings/kubernetes-archive-keyring.gpg] https://apt.kubernetes.io/ kubernetes-xenial main" | sudo tee /etc/apt/sources.list.d/kubernetes.list

$ sudo apt-get update
$ sudo apt-get install -y kubelet kubeadm kubectl
$ sudo apt-mark hold kubelet kubeadm kubectl

3. Initializing your control-plane node

$ kubeadm init -- 옵션들
[init] Using Kubernetes version: v1.24.1
[preflight] Running pre-flight checks
error execution phase preflight: [preflight] Some fatal errors occurred:
        [ERROR CRI]: container runtime is not running: output: E0531 14:39:51.155826   27989 remote_runtime.go:925] "Status from runtime service failed" err="rpc error: code = Unimplemented desc = unknown service runtime.v1alpha2.RuntimeService"
time="2022-05-31T14:39:51Z" level=fatal msg="getting status of runtime: rpc error: code = Unimplemented desc = unknown service runtime.v1alpha2.RuntimeService"
, error: exit status 1
[preflight] If you know what you are doing, you can make a check non-fatal with `--ignore-preflight-errors=...`
To see the stack trace of this error execute with --v=5 or higher

에러가 발생했습니다. 아래와 같이 설정파일 날리고 재실행하니 문제가 없었습니다.

unknown service runtime.v1alpha2.RuntimeService 과 같은 오류가 발생하게 되면 컨테이너 런타임에서 CRI 기능을 비활성화 한 경우이므로 다음 추가 작업을 진행합니다.
전체 master, node1, node2 에서

$ rm /etc/containerd/config.toml
# 아니면 안에 cri 내용을 주석처리 한다.
$ sudo systemctl restart containerd

가상환경에서는 --apiserver-advertise-address옵션을 줘야 192.168.56.xxx 으로 통신을 할 수 있습니다.

calico 기반

$ ubeadm init --apiserver-advertise-address=10.0.0.10 --pod-network-cidr=192.168.0.0/16

flannel 기반

(Master)$ sudo kubeadm init --apiserver-advertise-address=192.168.56.100 --pod-network-cidr=10.244.0.0/16

kubeadm를 초기화 한다. –pod-network-cidr는 반드시 10.244.0.0/16으로 설정해야 한다. Docker Version으로 인한 Error가 발생하면 kubeadm init 마지막에 '–ignore-preflight-errors=SystemVerification'를 붙인다.

아래와 같은 로그들이 출력 된다.

[init] Using Kubernetes version: v1.24.1
[preflight] Running pre-flight checks
[preflight] Pulling images required for setting up a Kubernetes cluster
[preflight] This might take a minute or two, depending on the speed of your internet connection
[preflight] You can also perform this action in beforehand using 'kubeadm config images pull'
[certs] Using certificateDir folder "/etc/kubernetes/pki"
[certs] Generating "ca" certificate and key
[certs] Generating "apiserver" certificate and key
[certs] apiserver serving cert is signed for DNS names [kubernetes kubernetes.default kubernetes.default.svc kubernetes.default.svc.cluster.local master] and IPs [10.96.0.1 10.0.2.15]
[certs] Generating "apiserver-kubelet-client" certificate and key
[certs] Generating "front-proxy-ca" certificate and key
[certs] Generating "front-proxy-client" certificate and key
[certs] Generating "etcd/ca" certificate and key
[certs] Generating "etcd/server" certificate and key
[certs] etcd/server serving cert is signed for DNS names [localhost master] and IPs [10.0.2.15 127.0.0.1 ::1]
[certs] Generating "etcd/peer" certificate and key
[certs] etcd/peer serving cert is signed for DNS names [localhost master] and IPs [10.0.2.15 127.0.0.1 ::1]
[certs] Generating "etcd/healthcheck-client" certificate and key
[certs] Generating "apiserver-etcd-client" certificate and key
[certs] Generating "sa" key and public key
[kubeconfig] Using kubeconfig folder "/etc/kubernetes"
[kubeconfig] Writing "admin.conf" kubeconfig file
[kubeconfig] Writing "kubelet.conf" kubeconfig file
[kubeconfig] Writing "controller-manager.conf" kubeconfig file
[kubeconfig] Writing "scheduler.conf" kubeconfig file
[kubelet-start] Writing kubelet environment file with flags to file "/var/lib/kubelet/kubeadm-flags.env"
[kubelet-start] Writing kubelet configuration to file "/var/lib/kubelet/config.yaml"
[kubelet-start] Starting the kubelet
[control-plane] Using manifest folder "/etc/kubernetes/manifests"
[control-plane] Creating static Pod manifest for "kube-apiserver"
[control-plane] Creating static Pod manifest for "kube-controller-manager"
[control-plane] Creating static Pod manifest for "kube-scheduler"
[etcd] Creating static Pod manifest for local etcd in "/etc/kubernetes/manifests"
[wait-control-plane] Waiting for the kubelet to boot up the control plane as static Pods from directory "/etc/kubernetes/manifests". This can take up to 4m0s
[apiclient] All control plane components are healthy after 10.507423 seconds
[upload-config] Storing the configuration used in ConfigMap "kubeadm-config" in the "kube-system" Namespace
[kubelet] Creating a ConfigMap "kubelet-config" in namespace kube-system with the configuration for the kubelets in the cluster
[upload-certs] Skipping phase. Please see --upload-certs
[mark-control-plane] Marking the node master as control-plane by adding the labels: [node-role.kubernetes.io/control-plane node.kubernetes.io/exclude-from-external-load-balancers]
[mark-control-plane] Marking the node master as control-plane by adding the taints [node-role.kubernetes.io/master:NoSchedule node-role.kubernetes.io/control-plane:NoSchedule]
[bootstrap-token] Using token: 39tu9f.zvo7sn8r11613q4u
[bootstrap-token] Configuring bootstrap tokens, cluster-info ConfigMap, RBAC Roles
[bootstrap-token] Configured RBAC rules to allow Node Bootstrap tokens to get nodes
[bootstrap-token] Configured RBAC rules to allow Node Bootstrap tokens to post CSRs in order for nodes to get long term certificate credentials
[bootstrap-token] Configured RBAC rules to allow the csrapprover controller automatically approve CSRs from a Node Bootstrap Token
[bootstrap-token] Configured RBAC rules to allow certificate rotation for all node client certificates in the cluster
[bootstrap-token] Creating the "cluster-info" ConfigMap in the "kube-public" namespace
[kubelet-finalize] Updating "/etc/kubernetes/kubelet.conf" to point to a rotatable kubelet client certificate and key
[addons] Applied essential addon: CoreDNS
[addons] Applied essential addon: kube-proxy

Your Kubernetes control-plane has initialized successfully!

To start using your cluster, you need to run the following as a regular user:

  mkdir -p $HOME/.kube
  sudo cp -i /etc/kubernetes/admin.conf $HOME/.kube/config
  sudo chown $(id -u):$(id -g) $HOME/.kube/config

Alternatively, if you are the root user, you can run:

  export KUBECONFIG=/etc/kubernetes/admin.conf

You should now deploy a pod network to the cluster.
Run "kubectl apply -f [podnetwork].yaml" with one of the options listed at:
  https://kubernetes.io/docs/concepts/cluster-administration/addons/

Then you can join any number of worker nodes by running the following on each as root:

kubeadm join 192.168.56.10:6443 --token 39tu9f.zvo7sn8r11613q4u \
        --discovery-token-ca-cert-hash sha256:a5ff918cb85ae91f474f8b49b7b3c2047c9eaa9be158c6cc470a382b7e3f9aee

controller, schedular, etcd 등이 생성된다.
node들에서 master와 연결을 하기 위해서는 token 정보를 알고 있어야 합니다.
아래는 예시입니다. 테스트기기 마다ㅏ 값이 다르기 때문에 메모할 필요가 있습니다

$ kubeadm join 192.168.56.10:6443 --token 39tu9f.zvo7sn8r11613q4u \
        --discovery-token-ca-cert-hash sha256:a5ff918cb85ae91f474f8b49b7b3c2047c9eaa9be158c6cc470a382b7e3f9aee

pod network

master에서만 실행

weave 계열

$ kubectl apply -f "https://cloud.weave.works/k8s/net?k8s-version=$(kubectl version | base64 | tr -d '\n')"
ARNING: This version information is deprecated and will be replaced with the output from kubectl version --short.  Use --output=yaml|json to get the full version.
serviceaccount/weave-net created
clusterrole.rbac.authorization.k8s.io/weave-net created
clusterrolebinding.rbac.authorization.k8s.io/weave-net created
role.rbac.authorization.k8s.io/weave-net created
rolebinding.rbac.authorization.k8s.io/weave-net created
daemonset.apps/weave-net created

flannel 설치

--pod-network-cidr=10.244.0.0/16 들 추가한다.

$ kubectl apply -f https://raw.githubusercontent.com/flannel-io/flannel/master/Documentation/kube-flannel.yml

vagrant network 에러

-- https://github.com/k3s-io/k3s/issues/72 에서 해결책을 찾음

$ wget https://raw.githubusercontent.com/flannel-io/flannel/master/Documentation/kube-flannel.yml
$ vi kube-flannel.yml
수정

  containers:
      - name: kube-flannel
        image: quay.io/coreos/flannel:v0.10.0-amd64
        command:
        - /opt/bin/flanneld
        args:
        - --ip-masq
        - --kube-subnet-mgr
        - --iface=enp0s8

자동완성 설정

# setup autocomplete in bash into the current shell, bash-completion package should be installed first.
$ source <(kubectl completion bash) 
# add autocomplete permanently to your bash shell.
$ echo "source <(kubectl completion bash)" >> ~/.bashrc
$ source ~/.bashrc

root 에서 안 error가 발생할 시 아래 내용을 /etc/bash.bashrc에 넣습니다. log out 후에 재접속 하면 반영 되는 것을 확인 할 수 있습니다.

echo 'if [ -f /etc/bash_completion ] && ! shopt -oq posix; then
    . /etc/bash_completion
fi' >> /etc/bash.bashrc

master node에서도 pod이 생성 되게 설정

# kubectl taint nodes --all node-role.kubernetes.io/control-plane- node-role.kubernetes.io/master-

dashboard 설치

https://kubernetes.io/docs/tasks/access-application-cluster/web-ui-dashboard/ 에 최신버전을 확인해nr 사용하도록 한다.

(Master)# kubectl apply -f https://raw.githubusercontent.com/kubernetes/dashboard/v2.5.0/aio/deploy/recommended.yaml

localhost:8080 error

worker node에서는 에러가 난다.. 모든 설정은 node1에서 되고 있으니 문제가 없어영

유용한 참조 블로그

https://ssup2.github.io/record/Kubernetes_%EC%84%A4%EC%B9%98_kubeadm_Ubuntu_18.04/

  • CNI 네트워크 설정을 해결하는데 큰 도움이 됨
반응형

'개발 > 가상화' 카테고리의 다른 글

Apache Mesos, Kubernetes 비교  (0) 2022.09.15
docker | error : Failed to get D-Bus connection: Operation not permitted  (0) 2022.07.14
kubenetes | vagrant 로 구성하기  (0) 2022.07.06
kubernetes | command  (0) 2022.07.05
XCP-ng Tools 설치  (0) 2018.11.29

kubernetes 환경을 로컬에 구성하기 위해서 virtualbox + vagrant 조합으로 쿠버네티스 구성을 만들어 보려고 합니다. 개발환경은 맥을 사용하기 때문에 homebrew를 통해서 설치하려고 합니다.

virtualboxvagrant를 설치합니다.

vagrantvirtualbox 를 관리하고 설정을 스크립트로 저장해서 사용할 수 있게 해주는 툴입니다. 간단한 for반복문을 통해서 어려대의 서버를 한꺼번에 생성할 수 있습니다. (병렬 생성은 아니고, 한개씩한개씩 생성합니다.)

1. virtual machine 준비

1.1. virtualbox, vagrant 설치

$ brew install virtualbox vagrant

Vagrantdocker-compose와 같이 폴더 안에 vagrantfile 파일을 통해서 virtualBox를 제어합니다.

1.1. OS 준비

이번에는 우분투를 사용해서 구성해 보려고 합니다. 지속적으로 업데이트되고있는 ubuntu 이미지를 사용했습니다. (개인적으로 레드햇계열을 사용하는데, 이미지가 안보여서 Debian 계열로 설치해 봤습니다.)

https://app.vagrantup.com/ubuntu/boxes/focal64 에 들어가면 vagrantfile에 들어가는 설정을 확인할 수 있습니다.

1.1.1. vagrantfile 생성

vagrant init 명령어를 통해서 vagrantfile파일을 생성합니다.

$ vagrant init ubuntu/focal64
$ vagrant up

아래는 vmware 기본설정안에 들어가는 내용입니다.

file ... vagrantfile

Vagrant.configure("2") do |config|
  config.vm.box = "ubuntu/focal64"
end

1.1.2. 쿠터네티스 구성

쿠터네티스는 아래와 같이 구성하려고 합니다.
설정을 할 때에 network 옵션을 추가해서 노드간 네트워크를 구성합니다.

  • master x1
  • node x2

가상머신을 구성할 때 node.vm.provision 옵션을 통해서 docker를 기본 설치하도록 설정할 수 있습니다.

vagrantfile을 통해서 n개의 node를 만들 수 있습니다. for문을 사용할 수 있습니다.
서버의 cpu, memory 제한에 대해서 설정을 할 수 있지만, 테스트로 사용하는 것이기 때문에 디테일한 설정을 사용하지 않겠습니다.

file ... vagrantfile

Vagrant.configure("2") do |config|
    config.vm.define "master" do |master|
        master.vm.box = "ubuntu/focal64"
        master.vm.network "private_network", ip: "192.168.56.100"
        master.vm.hostname = "master"
        master.vm.provision "docker"
    end

    config.vm.define "node1" do |node1|
        node1.vm.box = "ubuntu/focal64"
        node1.vm.network "private_network", ip: "192.168.56.101"
        node1.vm.hostname = "node1"
        node1.vm.provision "docker"
    end

    config.vm.define "node2" do |node2|
        node2.vm.box = "ubuntu/focal64"
        node2.vm.network "private_network", ip: "192.168.56.102"
        node2.vm.hostname = "node2"
        node2.vm.provision "docker"
end

1.1.3. virtualbox 실행

$ vagrant up

1.1.4. ssh 접속

config.vm.define 되어 있는 정보를 통해서 ssh접속을 할 수 있습니다.

$ vagrant ssh master

1.1.5. 쿠버네티스 설치를 위한 자동 구성

쿠버네티스 설치를 위한 bash 항목 입니다. 해당 내용은 https://kubernetes.io/docs/setup/production-environment/tools/kubeadm/install-kubeadm/ 에서 확인할 수 있습니다. 저는 그 내용을 모았습니다.

# /bin/bash
sudo swapoff -a
sudo sed -i '/swap/d' /etc/fstab
sudo apt-get update
sleep 1

sudo apt-get install -y ca-certificates apt-transport-https curl gnupg-agent software-properties-common
curl -fsSL https://download.docker.com/linux/ubuntu/gpg | sudo apt-key add -
sudo add-apt-repository \
"deb [arch=amd64] https://download.docker.com/linux/ubuntu \
$(lsb_release -cs) \
stable"
sudo apt-get update
sleep 1

sudo apt-get install -y docker-ce=$docker_ver docker-ce-cli=$docker_ver containerd.io
sudo systemctl enable docker
sudo systemctl start docker

# First Permission
sudo mkdir /etc/docker
# sudo chown $USER:docker /etc/docker

# Setup daemon.
sudo cat > /etc/docker/daemon.json <<EOF
{
  "exec-opts": ["native.cgroupdriver=systemd"],
  "log-driver": "json-file",
  "log-opts": {
    "max-size": "100m"
  },
  "storage-driver": "overlay2"
}
EOF

sudo mkdir -p /etc/systemd/system/docker.service.d

sudo systemctl daemon-reload
sudo systemctl restart docker
sudo systemctl enable docker
sudo modprobe br_netfilter
cat <<EOF | sudo tee /etc/sysctl.d/k8s.conf
net.bridge.bridge-nf-call-ip6tables = 1
net.bridge.bridge-nf-call-iptables = 1
EOF

sudo sysctl --system

curl -s https://packages.cloud.google.com/apt/doc/apt-key.gpg | sudo apt-key add -
cat <<EOF | sudo tee /etc/apt/sources.list.d/kubernetes.list
deb https://apt.kubernetes.io/ kubernetes-xenial main
EOF
sudo apt-get update
sleep 1

sudo apt-get install -y kubelet=$k8s_ver kubeadm=$k8s_ver kubectl=$k8s_ver
sudo apt-mark hold kubelet kubeadm kubectl

network 설정

vagrant 로 kubernetes설정 시 네트워크 문제가 발생합니다.
아래 명령을통해서 network 설정을 등록한다.

--node-ip에 등록되는 IP는 해당 node의 IP 를 말합니다. vagrant를 통해서 설치하면, 네트워크가 enp0s8vagrantfile에 설정되어 있는 IP로 할당되어있는 것을 확인할 수 있습니다.

$ echo "Environment=\"KUBELET_EXTRA_ARGS=--node-ip=192.168.56.101\"" >> /etc/systemd/system/kubelet.service.d/10-kubeadm.conf
$ systemctl daemon-reload
$ systemctl restart kubelet
[Service]
Environment="KUBELET_KUBECONFIG_ARGS=--bootstrap-kubeconfig=/etc/kubernetes/bootstrap-kubelet.conf --kubeconfig=/etc/kubernetes/kubelet.conf"
Environment="KUBELET_CONFIG_ARGS=--config=/var/lib/kubelet/config.yaml"
# This is a file that "kubeadm init" and "kubeadm join" generates at runtime, populating the KUBELET_KUBEADM_ARGS variable dynamically
EnvironmentFile=-/var/lib/kubelet/kubeadm-flags.env
# This is a file that the user can use for overrides of the kubelet args as a last resort. Preferably, the user should use
# the .NodeRegistration.KubeletExtraArgs object in the configuration files instead. KUBELET_EXTRA_ARGS should be sourced from this file.
EnvironmentFile=-/etc/default/kubelet
ExecStart=
ExecStart=/usr/bin/kubelet $KUBELET_KUBECONFIG_ARGS $KUBELET_CONFIG_ARGS $KUBELET_KUBEADM_ARGS $KUBELET_EXTRA_ARGS
Environment="KUBELET_EXTRA_ARGS=--node-ip=192.168.56.101"

docker ps 가 아무것도 안 나올때

쿠버네티스 구성을 끝냈지만, docker ps에서는 아무런 정보도 확인할 수 없을 때, 아래 명령어를 통해서 돌아가고 있는 것을 확인할 수 있습니다.
crictl는 디버깅 툴이지만, docker의 상태를 확인할 때도 유용합니다.

$ sudo crictl pods

본 글은 kubernetes 설치 항목에 이어집니다.

반응형

기본형식

$ kubectl [command] [type] [name] [flags]

COMMAND

  • create
  • get
  • delete
  • edit

TYPE

자원의 타입

  • node
  • pod
  • service

NAME

마음대로 수정가능

예) webserver,

FLAG

부가적인 설정을 할 수 있음.
--help, -o options 등으로 입력할 수 있음.

root@master:/home/vagrant# kubectl get node
NAME     STATUS   ROLES           AGE   VERSION
master   Ready    control-plane   37m   v1.24.1
node1    Ready    <none>          36m   v1.24.1
node2    Ready    <none>          36m   v1.24.1
$ kubectl get node -o wide
NAME     STATUS   ROLES           AGE   VERSION   INTERNAL-IP   EXTERNAL-IP   OS-IMAGE             KERNEL-VERSION      CONTAINER-RUNTIME
master   Ready    control-plane   40m   v1.24.1   10.0.2.15     <none>        Ubuntu 20.04.4 LTS   5.4.0-113-generic   containerd://1.6.4
node1    Ready    <none>          39m   v1.24.1   10.0.2.15     <none>        Ubuntu 20.04.4 LTS   5.4.0-113-generic   containerd://1.6.4
node2    Ready    <none>          38m   v1.24.1   10.0.2.15     <none>        Ubuntu 20.04.4 LTS   5.4.0-113-generic   containerd://1.6.4
$ kubectl describe nodes master
$ kubectl run webserver --image:nginx:1.14 --port 80
pod/webserver created

# pod 정보확인

$ kubectl describe pod webserver

상세정보로 현재 실행상태를 파악할 수 있습니다.
자세히 살펴보니 네트워크 설정 오류로 판단되어 kubeadm 으로 리셋 후 다시 설정하기로 하였다.

$ kubeadm reset 
$ systemctl restart kubelet

# 2. cni 관련 디렉토리 파일 삭제(마스터에서만)
$ rm -rf /etc/cni/net.d/*
$ rm -rf $HOME/.kube/config
반응형

+ Recent posts