개요
DevOps 방식에서는 정기적으로 여러 배포를 사용하여 '지속적 배포', 'Blue/Green 배포', 'Canary 배포'와 같은 애플리케이션 배포 시나리오를 관리합니다. 이 실습에서는 여러 이기종 배포가 사용되는 일반적인 시나리오를 처리할 수 있도록 컨테이너를 확장 및 관리하는 연습이 제공됩니다.
실습할 내용
- kubectl 도구 사용 연습
- 배포 yaml 파일 만들기
- 배포 시작, 업데이트 및 확장
- 배포 및 배포 스타일 업데이트 연습
기본 요건
학습을 극대화하려면 이 실습에서 다음을 권장합니다.
다음 Google Cloud Skills Boost 실습을 수강했습니다.
Linux 시스템 관리 기술이 있습니다.
DevOps 이론: 지속적인 배포의 개념을 이해합니다.
배포 소개
이기종 배포에서는 일반적으로 특정한 기술적 요구 또는 운영상의 요구를 충족하기 위해 2개 이상의 상이한 인프라 환경 또는 리전을 연결합니다. 이기종 배포는 배포 특성에 따라 '하이브리드', '다중 클라우드' 또는 '공용/사설'이라고 부릅니다.
이 실습에서 이기종 배포에는 단일 클라우드 환경이나 다중 공용 클라우드 환경(다중 클라우드), 또는 온프레미스와 공용 클라우드가 조합된 환경(하이브리드 또는 공용/사설)에서 진행하는 다수의 리전에 걸친 배포가 포함됩니다.
단일 환경 또는 리전에 한정된 배포에서는 다양한 비즈니스 및 기술적 난점이 발생할 수 있습니다.
- 여유 리소스 부족: 단일 환경, 특히 온프레미스 환경에서는 프로덕션 요구를 충족시킬 수 있는 컴퓨팅, 네트워킹, 저장소 리소스가 모자랄 수 있습니다.
- 제한된 지리적 범위: 단일 환경에서의 배포를 위해서는 지리적으로 서로 멀리 떨어진 사용자들이 하나의 배포에 액세스해야 합니다. 이러한 사용자의 트래픽은 특정 위치까지 전 세계를 돌아서 이동합니다.
- 제한된 가용성: 웹 규모의 트래픽 패턴에서는 애플리케이션의 내결함성 및 탄력성이 상당히 요구됩니다.
- 공급업체 고착화: 공급업체 수준의 플랫폼 및 인프라 추상화로 인해 애플리케이션 이식이 어려울 수 있습니다.
- 유연하지 않은 리소스: 특정 컴퓨팅, 저장소 또는 네트워킹 오퍼링 집합으로 리소스가 제한될 수 있습니다.
이기종 배포는 이러한 문제를 해결하는 데 도움이 될 수 있지만, 프로그래매틱하며 결정론적인 프로세스와 절차를 사용해서 아키텍처를 구성해야 합니다. 일회성 또는 임시 배포 절차는 배포 또는 프로세스의 취약성을 높이고 내결함성을 저하시킬 수 있습니다. 임시 프로세스는 데이터 손실 또는 트래픽 누락을 일으킬 수 있습니다. 올바른 배포 프로세스는 반복 가능해야 하며, 입증된 프로비저닝, 구성, 유지 관리 방식을 사용해야 합니다.
이기종 배포를 위한 일반적인 시나리오는 다중 클라우드 배포, 온프레미스 데이터 프론팅, CI/CD(지속적 통합/지속적 배포) 프로세스입니다.
다음 실습에서는 Kubernetes 및 다른 인프라 리소스를 사용한 잘 구성된 접근 방법과 함께 이기종 배포를 위한 몇 가지 일반적인 사용 사례를 연습합니다
영역 설정
- 다음 명령어를 실행하여 GCP 영역을 설정하고, 로컬 영역을 로 대체합니다.
$ gcloud config set compute/zone us-east4-a
- 샘플코드 가져오기
$ gsutil -m cp -r gs://spls/gsp053/orchestrate-with-kubernetes . $ cd orchestrate-with-kubernetes/kubernetes - 노드 3개로 클러스터를 만듭니다. 이 작업은 완료하는 데 몇 분 정도 걸릴 수 있습니다.
$ gcloud container clusters create bootcamp \
--machine-type e2-small \
--num-nodes 3 \
--scopes "https://www.googleapis.com/auth/projecthosting,storage-rw"
작업 1. 배포 객체에 관해 알아보기
배포를 시작해 보겠습니다. 먼저 배포 객체를 살펴보겠습니다.
kubectl의explain명령어를 통해 배포 객체에 관해 알 수 있습니다.$ kubectl explain deployment
KIND: Deployment
VERSION: apps/v1
DESCRIPTION:
Deployment enables declarative updates for Pods and ReplicaSets.
FIELDS:
apiVersion
APIVersion defines the versioned schema of this representation of an
object. Servers should convert recognized schemas to the latest internal
value, and may reject unrecognized values. More info:
https://git.k8s.io/community/contributors/devel/sig-architecture/api-conventions.md#resources
kind
Kind is a string value representing the REST resource this object
represents. Servers may infer this from the endpoint the client submits
requests to. Cannot be updated. In CamelCase. More info:
https://git.k8s.io/community/contributors/devel/sig-architecture/api-conventions.md#types-kinds
metadata
spec
status
2.  `--recursive` 옵션을 사용하여 모든 필드를 볼 수도 있습니다.
```bash
$ kubectl explain deployment --recursive- 실습을 진행하는 과정에서 explain 명령어를 사용하면 배포 객체의 구조를 이해하고 개별 필드의 기능을 이해하는 데 도움이 됩니다.
$ kubectl explain deployment.metadata.name
KIND: Deployment
VERSION: apps/v1
FIELD: name
DESCRIPTION:
Name must be unique within a namespace. Is required when creating
resources, although some resources may allow a client to request the
generation of an appropriate name automatically. Name is primarily intended
for creation idempotence and configuration definition. Cannot be updated.
More info: http://kubernetes.io/docs/user-guide/identifiers#names
## 작업 2. 배포 만들기

1.  `deployments/auth.yaml` 구성 파일을 업데이트합니다.
```bash
vi deployments/auth.yaml- 배포의 containers 섹션에 있는
image를 다음과 같이 변경합니다.
```vim
...
containers:
- name: auth
image: kelseyhightower/auth:1.0.0
...
- 이제 간단한 배포를 만들겠습니다. 배포 구성 파일을 검사합니다.
$ cat deployments/auth.yaml
apiVersion: apps/v1
kind: Deployment
metadata:
name: auth
spec:
replicas: 1
selector:
matchLabels:
app: auth
template:
metadata:
labels:
app: auth
track: stable
spec:
containers:
- name: auth
image: "kelseyhightower/auth:1.0.0"
ports:
- name: http
containerPort: 80
- name: health
containerPort: 81
...
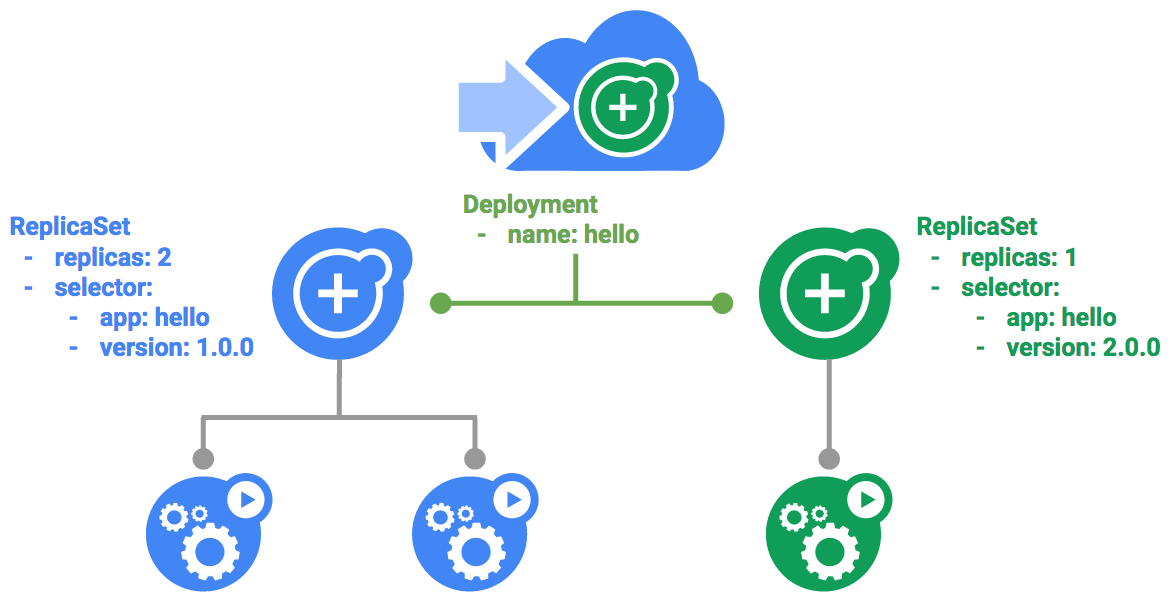
배포를 통해 어떻게 하나의 복제본이 생성되고 버전 1.0.0의 인증 컨테이너를 사용하는지 확인하세요.

`kubectl create` 명령어를 실행하여 인증 배포를 만들면 배포 매니페스트의 데이터에 따라 하나의 포드가 생성됩니다. 즉, `replicas` 필드에 지정된 숫자를 변경하여 포드의 수를 조정할 수 있습니다.

6.  `kubectl create`를 사용하여 배포 객체를 만듭니다.
```bash
$ kubectl create -f deployments/auth.yaml
deployment.apps/auth created- 배포를 만들면 생성 여부를 확인할 수 있습니다.
$ kubectl get deployments
NAME   READY   UP-TO-DATE   AVAILABLE   AGE
auth   1/1     1            1           23s
$ kubectl get deployments -o wide
NAME READY UP-TO-DATE AVAILABLE AGE CONTAINERS IMAGES SELECTOR
auth 1/1 1 1 33s auth kelseyhightower/auth:1.0.0 app=auth
8.  배포가 생성되면, Kubernetes에서는 배포에 관한 ReplicaSet를 만듭니다. 배포에 관한 ReplicaSet가 생성되었는지 확인할 수 있습니다.
```bash
$ kubectl get replicasets
NAME             DESIRED   CURRENT   READY   AGE
auth-5c65b6d58   1         1         1       103s
이름이 auth-xxxxxxx인 ReplicaSet가 표시되어야 합니다.
- 마지막으로, 배포의 일부로 생성된 포드를 볼 수 있습니다. ReplicaSet가 생성될 때 Kubernetes에서 단일 포드를 생성합니다.
$ kubectl get pods NAME READY STATUS RESTARTS AGE auth-5c65b6d58-tqwbn 1/1 Running 0 2m3s - 이제 인증을 배포하기 위한 서비스를 만들 차례입니다. 서비스 매니페스트 파일은 이미 살펴보았으므로 여기서는 자세히 설명하지 않겠습니다.
kubectl create명령어를 사용하여 인증 서비스를 만듭니다.$ kubectl create -f services/auth.yaml service/auth created - 이제 같은 방법으로 hello 배포를 만들고 노출합니다.
$ kubectl create -f deployments/hello.yaml deployment.apps/hello created $ kubectl create -f services/hello.yaml service/hello created - 한번 더 frontend 배포를 만들고 노출합니다.
$ kubectl create secret generic tls-certs --from-file tls/
$ kubectl create configmap nginx-frontend-conf --from-file=nginx/frontend.conf
$ kubectl create -f deployments/frontend.yaml
$ kubectl create -f services/frontend.yaml
configmap/nginx-frontend-conf created
deployment.apps/frontend created
service/frontend created
> **참고:** 프런트엔드용 ConfigMap을 만들었습니다.

13.  외부 IP를 가져와서 프런트엔드와 연결함으로써 프런트엔드와 상호작용합니다.
```bash
$ kubectl get services frontend
NAME       TYPE           CLUSTER-IP    EXTERNAL-IP     PORT(S)         AGE
frontend   LoadBalancer   10.88.6.204   35.199.58.119   443:30354/TCP   38s
참고: 서비스에 대해 ExternalIP 필드가 채워지는 데 몇 초 정도 걸릴 수 있습니다. 이것은 정상입니다. 필드가 채워질 때까지 몇 초마다 위의 명령을 다시 실행하십시오.
$ curl -ks https://<EXTERNAL-IP>
{"message":"Hello"}kubectl의 출력 템플릿 기능을 사용하여 curl을 한 줄 명령어로 사용할 수도 있습니다.$ curl -ks https://`kubectl get svc frontend -o=jsonpath="{.status.loadBalancer.ingress[0].ip}"`
배포 확장
이제 배포가 생성되었으므로 확장할 수 있습니다. spec.replicas 필드를 업데이트하면 됩니다.
kubectl explain명령어를 다시 사용하여 이 필드에 관한 설명을 볼 수 있습니다.$ kubectl explain deployment.spec.replicas KIND: Deployment VERSION: apps/v1
FIELD: replicas
DESCRIPTION:
Number of desired pods. This is a pointer to distinguish between explicit
zero and not specified. Defaults to 1.
2.  replicas 필드를 가장 쉽게 업데이트하는 방법은 `kubectl scale` 명령어를 사용하는 것입니다.
```bash
$ kubectl scale deployment hello --replicas=5
deployment.apps/hello scaled
참고: 새 pod가 모두 시작되는 데는 1~2분 정도 걸릴 수 있습니다.
배포가 업데이트된 후, Kubernetes는 연결된 ReplicaSet를 자동으로 업데이트하고 새로운 pod를 시작하여 pod의 총 개수를 5로 만듭니다.
- 현재
hello포드가 5개 실행되고 있는지 확인합니다.$ kubectl get pods | grep hello- | wc -l 5 - 이제 애플리케이션을 다시 축소합니다.
$ kubectl scale deployment hello --replicas=3 - 포드 개수가 맞는지 다시 확인합니다.
지금까지 Kubernetes 배포와 포드 그룹을 관리하고 확장하는 방법을 알아보았습니다.$ kubectl get pods | grep hello- | wc -l 3
작업 3. 순차적 업데이트
배포는 순차적 업데이트 메커니즘을 통해 이미지를 새 버전으로 업데이트하도록 지원합니다. 배포가 새 버전으로 업데이트되면 새 ReplicaSet가 만들어지고, 이전 ReplicaSet의 복제본이 감소하면서 새 ReplicaSet의 복제본 수가 천천히 증가합니다.
순차적 업데이트 트리거하기
- 배포를 업데이트하려면 다음 명령어를 실행합니다.
$ kubectl edit deployment hello - 배포의 containers 섹션에 있는
image를 다음과 같이 변경합니다.
편집기에서 저장하면, 업데이트된 배포가 클러스터에 저장되고 Kubernetes에서 순차적 업데이트가 시작됩니다.... containers: image: kelseyhightower/hello:2.0.0 ... - Kubernetes에서 생성한 새로운 ReplicaSet를 확인합니다.
$ kubectl get replicaset NAME DESIRED CURRENT READY AGE auth-5c65b6d58 1 1 1 30m frontend-886c96b4d 1 1 1 9m55s hello-7c575694fc 1 1 1 10m hello-8654fb85d 3 3 2 33s - 출시 기록에 새로운 항목이 표시될 수도 있습니다.
$ kubectl rollout history deployment/hello
eployment.apps/hello
REVISION  CHANGE-CAUSE
1         <none>
2         <none>
순차적 업데이트 일시중지하기
실행 중인 출시에 문제가 발생하면 일시중지하여 업데이트를 중지합니다.
- 지금 중지해보세요.
$ kubectl rollout pause deployment/hello deployment.apps/hello paused - 현재 출시 상태를 확인합니다.
$ kubectl rollout status deployment/hello deployment "hello" successfully rolled out - 포드에서 직접 확인할 수도 있습니다.
$ kubectl get pods -o jsonpath --template='{range .items[*]}{.metadata.name}{"\t"}{"\t"}{.spec.containers[0].image}{"\n"}{end}'
auth-5c65b6d58-tqwbn            kelseyhightower/auth:1.0.0
frontend-886c96b4d-72rxf                nginx:1.9.14
hello-8654fb85d-jmh7p           kelseyhightower/hello:2.0.0
hello-8654fb85d-njgcb           kelseyhightower/hello:2.0.0
hello-8654fb85d-rqfht           kelseyhightower/hello:2.0.0
순차적 업데이트 재개하기
출시가 일시중지되었으므로 일부 포드는 새 버전이고 일부 포드는 이전 버전입니다.
resume명령어를 사용하여 출시를 계속 진행할 수 있습니다.$ kubectl rollout resume deployment/hello deployment.apps/hello resumed- 출시가 완료되면
status명령어를 실행할 때 다음이 표시됩니다.$ kubectl rollout status deployment/hello deployment "hello" successfully rolled out업데이트 롤백하기
새 버전에서 버그가 발견되었다고 가정해 보겠습니다. 새 버전에 문제가 있는 것으로 간주되므로 새 포드에 연결된 모든 사용자가 문제를 경험하게 됩니다.
이전 버전으로 롤백하여 문제를 조사한 다음 제대로 수정된 버전을 출시할 수 있습니다.
rollout명령어를 사용하여 이전 버전으로 롤백합니다.$ kubectl rollout undo deployment/hello deployment.apps/hello rolled back- 기록에서 롤백을 확인합니다.
$ kubectl rollout history deployment/hello deployment.apps/hello REVISION CHANGE-CAUSE 2 <none> 3 <none> - 마지막으로, 모든 포드가 이전 버전으로 롤백되었는지 확인합니다.
$ kubectl get pods -o jsonpath --template='{range .items[*]}{.metadata.name}{"\t"}{"\t"}{.spec.containers[0].image}{"\n"}{end}'
auth-5c65b6d58-tqwbn            kelseyhightower/auth:1.0.0
frontend-886c96b4d-72rxf                nginx:1.9.14
hello-7c575694fc-2lmt5          kelseyhightower/hello:1.0.0
hello-7c575694fc-6sxmd          kelseyhightower/hello:1.0.0
hello-7c575694fc-rjs57          kelseyhightower/hello:1.0.0
작업 4. Canary 배포
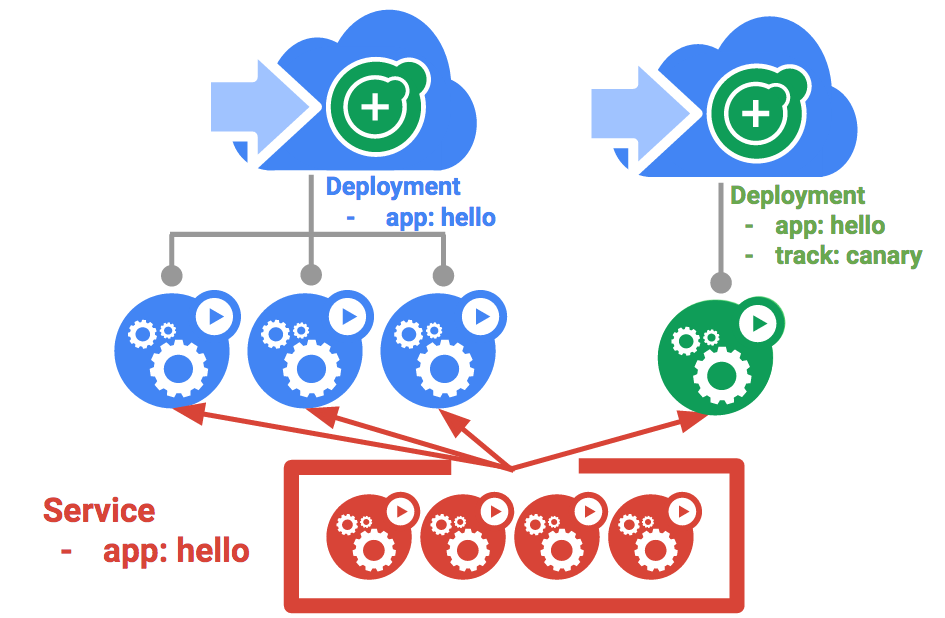
프로덕션 환경에서 일부 사용자를 대상으로 새 배포를 테스트하려면 Canary 배포를 사용하세요. Canary 배포를 사용하면 작은 규모의 일부 사용자에게만 변경 사항을 릴리스하여 새로운 릴리스와 관련된 위험을 완화할 수 있습니다.
Canary 배포 만들기
Canary 배포는 새 버전의 별도 배포와 함께 기존 안정화 배포 및 Canary 배포를 동시에 대상으로 삼는 서비스로 구성됩니다.
- 먼저 새 버전의 새로운 Canary 배포를 만듭니다.
$ cat deployments/hello-canary.yaml - 이제 Canary 배포를 만듭니다.
$ kubectl create -f deployments/hello-canary.yaml deployment.apps/hello-canary created - Canary 배포를 만들면
hello및hello-canary의 두 가지 배포가 생깁니다. 다음kubectl명령어로 확인하세요.$ kubectl get deployments NAME READY UP-TO-DATE AVAILABLE AGE auth 1/1 1 1 38m frontend 1/1 1 1 18m hello 3/3 3 3 19m hello-canary 1/1 1 1 32shello서비스에서 선택기는 프로덕션 배포 및 Canary 배포의 pod에 모두 맞는app:hello선택기를 사용합니다. 그러나 Canary 배포가 포드 수가 더 적기 때문에 더 적은 수의 사용자에게 표시됩니다.
Canary 배포 확인하기
- 요청에서 제공되는
hello버전을 확인할 수 있습니다.curl -ks https://`kubectl get svc frontend -o=jsonpath="{.status.loadBalancer.ingress[0].ip}"`/version {"version":"1.0.0"}프로덕션 환경의 Canary 배포 - 세션 어피니티
이 실습의 사례에서는 Nginx 서비스로 전송된 모든 요청이 Canary 배포에서 처리될 가능성이 있었습니다. 어떤 사용자가 Canary 배포를 통해 서비스를 받지 못하도록 하려면 다른 접근 방식이 필요합니다. 예를 들어, 애플리케이션의 UI가 변경되어 특정 사용자에게 혼동을 주지 않으려는 경우가 있을 수 있습니다. 이와 같은 경우에는 해당 사용자를 한 배포 또는 다른 배포에 '고정'해야 합니다.
서비스와 함께 세션 어피티니를 만들면 동일한 사용자에게 항상 동일한 버전을 제공할 수 있습니다. 아래 예제에서 서비스는 이전과 동일하지만 새로운 sessionAffinity 필드가 추가되어 ClientIP로 설정됩니다. IP 주소가 동일한 모든 클라이언트는 동일한 버전의 hello 애플리케이션으로 요청을 보냅니다.
kind: Service
apiVersion: v1
metadata:
  name: "hello"
spec:
  sessionAffinity: ClientIP
  selector:
    app: "hello"
  ports:
    - protocol: "TCP"
      port: 80
      targetPort: 80
이를 테스트하기 위한 환경을 설정하기가 어렵기 때문에 여기에서는 테스트할 필요가 없지만, 프로덕션 환경의 Canary 배포에는 sessionAffinity를 사용할 수 있습니다.
작업 5. Blue/Green 배포
순차적 업데이트는 최소한의 오버헤드, 최소한의 성능 영향, 최소한의 다운타임으로 애플리케이션을 배포할 수 있기 때문에 가장 좋은 업데이트 방식입니다. 그러나 배포를 모두 완료한 후에 부하 분산기를 수정하여 새 버전을 가리키도록 하는 것이 유리한 경우가 있습니다. 이 경우에는 Blue/Green 배포가 도움이 됩니다.
Kubernetes에서는 이전의 'blue' 버전용 배포와 새로운 'green' 버전용 배포를 만들어 업데이트할 수 있습니다. 'blue' 버전에 기존 hello 배포를 사용하면 라우터 역할을 하는 서비스를 통해 배포에 액세스하게 됩니다. 새 'green' 버전이 가동 및 실행되면 서비스를 업데이트하여 이 버전을 사용하도록 전환하게 됩니다.
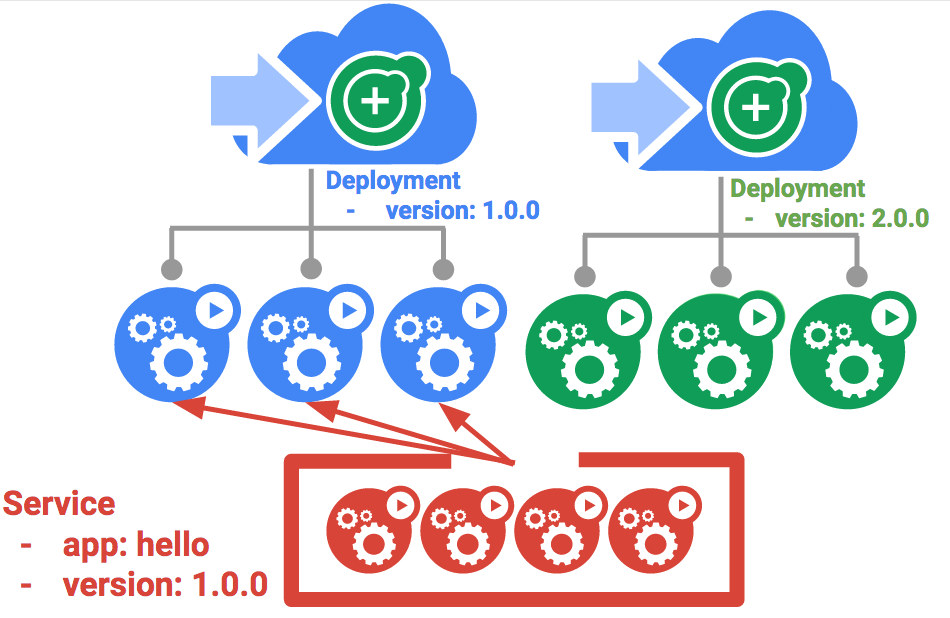
Blue/Green 배포의 주요 단점은 애플리케이션을 호스팅하려면 클러스터에 최소 2배의 리소스가 필요하다는 점입니다. 한 번에 두 버전의 애플리케이션을 배포하려면 먼저 클러스터에 충분한 리소스가 있는지 확인하세요.
서비스
기존의 hello 서비스를 사용하되 app:hello, version: 1.0.0으로 선택기를 업데이트하세요. 선택기는 기존의 'blue' 배포를 선택하지만 그러나 다른 버전을 사용할 것이기 때문에 'green' 배포는 선택하지 않습니다.
먼저 서비스를 업데이트합니다.
$ kubectl apply -f services/hello-blue.yaml
Warning: resource services/hello is missing the kubectl.kubernetes.io/last-applied-configuration annotation which is required by kubectl apply. kubectl apply should only be used on resources created declaratively by either kubectl create --save-config or kubectl apply. The missing annotation will be patched automatically.
service/hello configured
참고:
resource service/hello is missing이라는 경고는 자동으로 패치되므로 무시하십시오.
Blue/Green 배포를 사용하여 업데이트하기
Blue/Green 배포 스타일을 지원하기 위해 새 버전용으로 새로운 'green' 배포를 만들 것입니다. Green 배포에서 버전 라벨과 이미지 경로를 업데이트합니다.
- Green 배포를 만듭니다.
$ kubectl create -f deployments/hello-green.yaml deployment.apps/hello-green created - Green 배포가 있고 제대로 시작된 경우 현재 1.0.0 버전이 아직 사용되고 있는지 확인합니다.
$ curl -ks https://`kubectl get svc frontend -o=jsonpath="{.status.loadBalancer.ingress[0].ip}"`/version {"version":"1.0.0"} - 이제 서비스가 새 버전을 가리키도록 업데이트합니다.
$ kubectl apply -f services/hello-green.yaml service/hello configured - 서비스가 업데이트되면 'green' 배포가 즉시 사용됩니다. 이제 항상 새 버전이 사용되고 있는지 확인할 수 있습니다.
$ curl -ks https://`kubectl get svc frontend -o=jsonpath="{.status.loadBalancer.ingress[0].ip}"`/version
{"version":"2.0.0"}
Blue/Green 롤백
필요한 경우 같은 방법으로 이전 버전으로 롤백할 수 있습니다.
- 'blue' 배포가 아직 실행 중일 때 서비스를 이전 버전으로 다시 업데이트하면 됩니다.
$ kubectl apply -f services/hello-blue.yaml - 서비스를 업데이트하면 롤백이 성공적으로 완료됩니다. 사용 중인 버전이 정확한지 다시 확인합니다.
$ curl -ks https://`kubectl get svc frontend -o=jsonpath="{.status.loadBalancer.ingress[0].ip}"`/version
{"version":"1.0.0"}
'개발 > 가상화' 카테고리의 다른 글
| kubernetes_gcloud_3_Kubernetes를 통한 클라우드 조정 (0) | 2023.04.25 |
|---|---|
| kubernetes_gcloud_2_ Kubernetes Engine(Qwik Start) (0) | 2023.04.20 |
| kubernetes_gcloud_1_docker_introduce (0) | 2023.04.18 |
| Apache Mesos, Kubernetes 비교 (0) | 2022.09.15 |
| docker | error : Failed to get D-Bus connection: Operation not permitted (0) | 2022.07.14 |